主题
Pi Monorepo 源码调试指南
本文档覆盖 5 个包的调试方法:pi-ai、pi-tui、pi-agent-core、pi-coding-agent、pi-web-ui。 每个包都包含:环境准备、测试分类(是否需要 API Key)、具体调试命令、断点调试配置、推荐的学习路径。
目录
- 通用环境准备
- 一、pi-ai 调试
- 二、pi-tui 调试
- 三、pi-agent-core 调试
- 四、pi-coding-agent 调试
- 五、pi-web-ui 调试
- 附录 A:VSCode 调试配置模板
- 附录 B:API Key 配置参考
- 附录 C:常见问题排查
通用环境准备
1. 安装依赖与构建
bash
cd /Users/bytedance/Desktop/ai-study/pi-mono
npm install
npm run build
2. 验证构建成功
bash
npm run check如果有报错,先解决构建问题再进行调试。
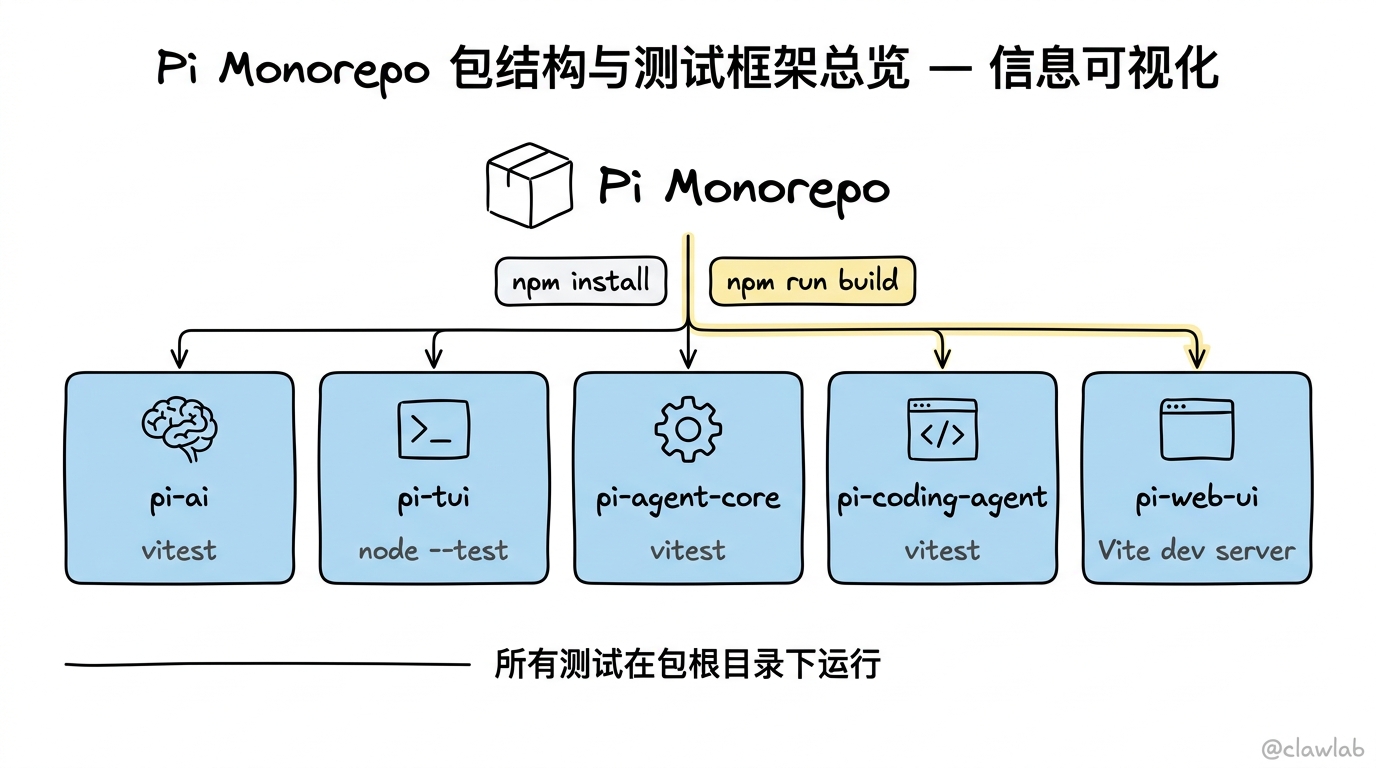
3. 了解测试框架差异
| 包 | 测试框架 | 运行方式 |
|---|---|---|
| pi-ai | vitest | npx tsx ../../node_modules/vitest/dist/cli.js --run test/xxx.test.ts |
| pi-agent-core | vitest | 同上 |
| pi-coding-agent | vitest | 同上 |
| pi-tui | node --test | node --test --import tsx test/xxx.test.ts |
| pi-web-ui | 无自动化测试 | Vite dev server + 手动测试 |
关键规则:所有测试都必须在包根目录下运行,不是 monorepo 根目录。
4. 调试工具选择
- 命令行调试:直接运行测试看输出
- VSCode 断点调试:通过
launch.json配置(见附录 A) - console.log 调试:在源码中临时添加日志
- Node.js Inspector:
node --inspect-brk+ Chrome DevTools
一、pi-ai 调试
包路径:packages/ai/测试框架:vitest vitest 配置:globals: true, environment: "node", testTimeout: 30000
1.1 测试文件分类
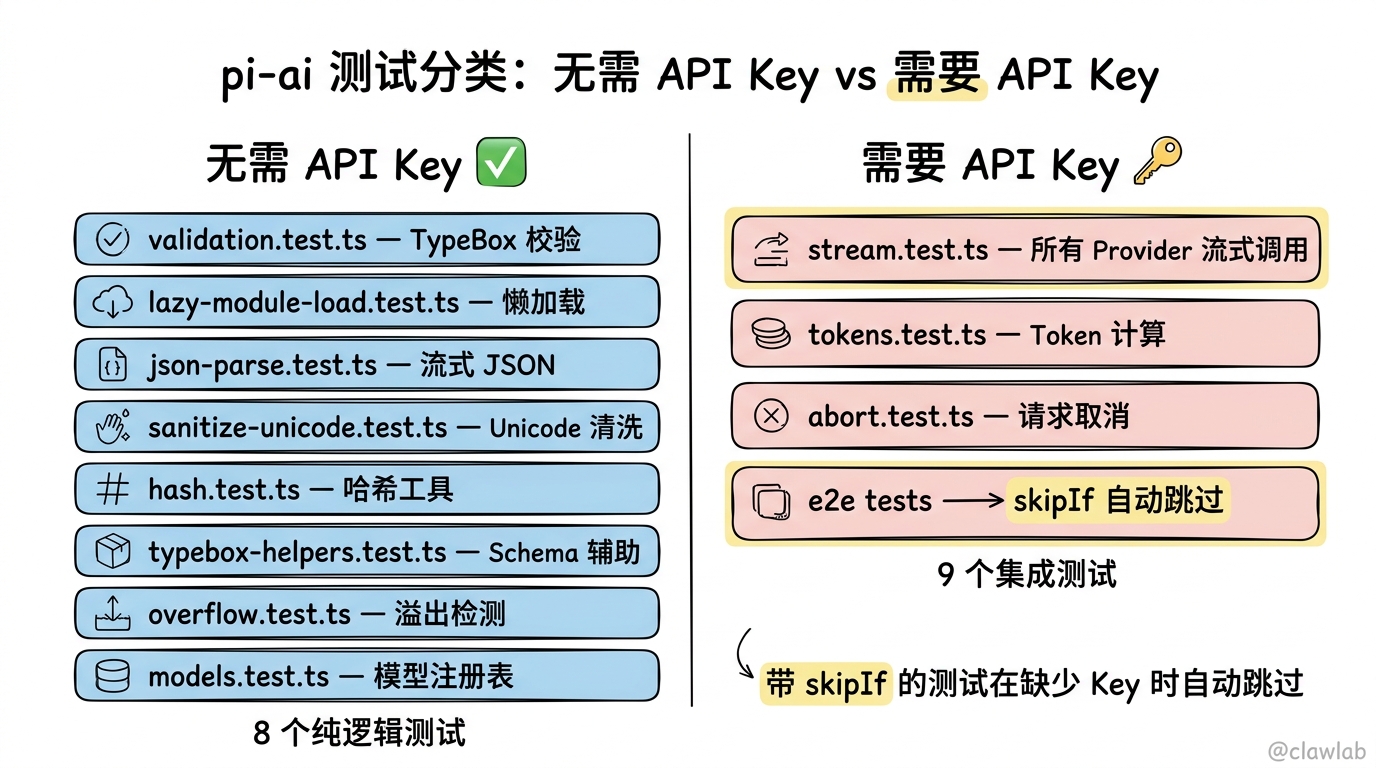
不需要 API Key 的测试(可直接运行)
这些测试使用 mock 或纯逻辑验证,不调用真实 LLM API:
| 测试文件 | 测试内容 | 学习价值 |
|---|---|---|
validation.test.ts | 工具参数校验降级逻辑 | 理解 TypeBox schema 校验机制 |
lazy-module-load.test.ts | 懒加载机制验证 | 理解 Provider 注册与按需加载 |
json-parse.test.ts | 流式 JSON 解析 | 理解 tool_call 参数的增量解析 |
sanitize-unicode.test.ts | Unicode 代理对清洗 | 理解流式文本的边界处理 |
hash.test.ts | 哈希工具 | 简单工具函数 |
typebox-helpers.test.ts | TypeBox schema 辅助工具 | 理解 StringEnum 等自定义 schema |
overflow.test.ts | 上下文溢出检测 | 理解 token 计算与 context window 管理 |
models.test.ts | 模型注册表查询 | 理解 getModel/getProviders/calculateCost |
需要 API Key 的测试(集成测试)
这些测试会真实调用 LLM API,需要对应的环境变量:
| 测试文件 | 所需环境变量 | 测试内容 |
|---|---|---|
stream.test.ts | 多个 Provider 的 Key | 所有 Provider 的流式调用 |
tokens.test.ts | 多个 Provider 的 Key | Token 计算准确性 |
total-tokens.test.ts | 多个 Provider 的 Key | totalTokens 字段验证 |
abort.test.ts | 至少一个 Provider 的 Key | 流式请求取消 |
empty.test.ts | 至少一个 Provider 的 Key | 空响应处理 |
context-overflow.test.ts | 至少一个 Provider 的 Key | 上下文溢出行为 |
cross-provider-handoff.test.ts | 至少两个 Provider 的 Key | 跨 Provider 交接 |
unicode-surrogate.test.ts | 多个 Provider 的 Key | Unicode 处理(带 skipIf) |
xhigh.test.ts | OPENAI_API_KEY | xhigh 思考等级 |
带
skipIf的测试会在缺少对应 Key 时自动跳过,不会报错。
1.2 运行命令
bash
cd packages/ai

# 运行单个不需要 API Key 的测试
npx tsx ../../node_modules/vitest/dist/cli.js --run test/validation.test.ts
npx tsx ../../node_modules/vitest/dist/cli.js --run test/lazy-module-load.test.ts
npx tsx ../../node_modules/vitest/dist/cli.js --run test/json-parse.test.ts
npx tsx ../../node_modules/vitest/dist/cli.js --run test/overflow.test.ts
npx tsx ../../node_modules/vitest/dist/cli.js --run test/models.test.ts

# 运行需要 API Key 的测试(会自动跳过没有 Key 的 Provider)
OPENAI_API_KEY=sk-xxx npx tsx ../../node_modules/vitest/dist/cli.js --run test/stream.test.ts

# 运行所有测试(需要 API Key 的会被跳过)
npx tsx ../../node_modules/vitest/dist/cli.js --run
1.3 推荐的调试学习路径
第一步:纯逻辑测试(无需 API Key)
bash
cd packages/ai

# 1. 模型注册表 — 理解 getModel, getProviders, calculateCost
npx tsx ../../node_modules/vitest/dist/cli.js --run test/models.test.ts

# 2. 参数校验 — 理解 TypeBox 在 tool calling 中的作用
npx tsx ../../node_modules/vitest/dist/cli.js --run test/validation.test.ts

# 3. 懒加载 — 理解 Provider SDK 的按需加载机制
npx tsx ../../node_modules/vitest/dist/cli.js --run test/lazy-module-load.test.ts

# 4. JSON 解析 — 理解流式 tool_call 参数的增量解析
npx tsx ../../node_modules/vitest/dist/cli.js --run test/json-parse.test.ts

# 5. 溢出检测 — 理解 context window 管理
npx tsx ../../node_modules/vitest/dist/cli.js --run test/overflow.test.ts
第二步:集成测试(需要 API Key)
建议先只配置一个 Provider 的 Key(推荐 OpenAI 或 Anthropic),逐步添加:
bash
# 只测试 OpenAI 相关用例(其他 Provider 会被自动跳过)
OPENAI_API_KEY=sk-xxx npx tsx ../../node_modules/vitest/dist/cli.js --run test/stream.test.ts
1.4 断点调试要点
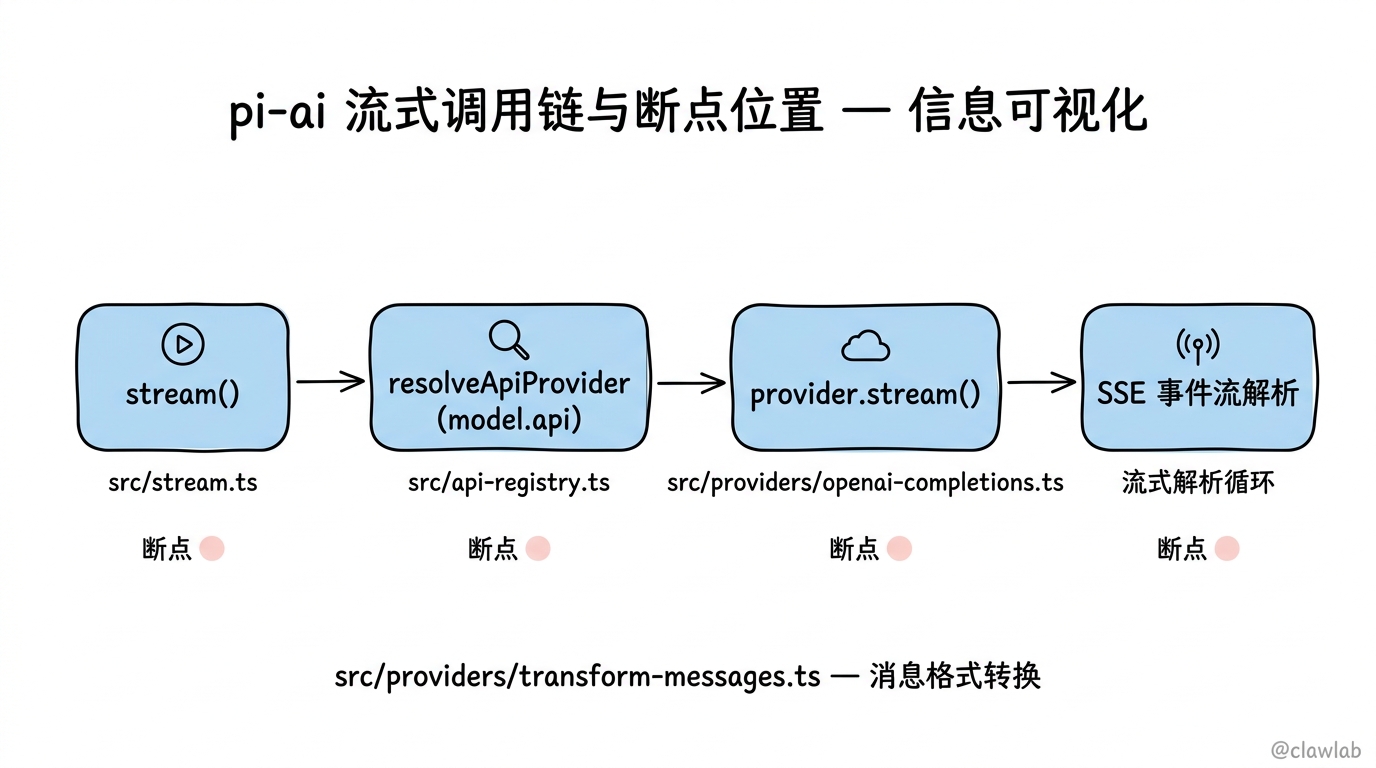
在 stream.ts 中设断点,观察调用链:
stream() → resolveApiProvider(model.api) → provider.stream() → SSE 事件流解析关键断点位置:
src/stream.ts的stream()函数入口src/api-registry.ts的getApiProvider()— 观察 Provider 查找src/providers/openai-completions.ts的流式解析循环 — 观察事件发射src/providers/transform-messages.ts— 观察消息格式转换
二、pi-tui 调试
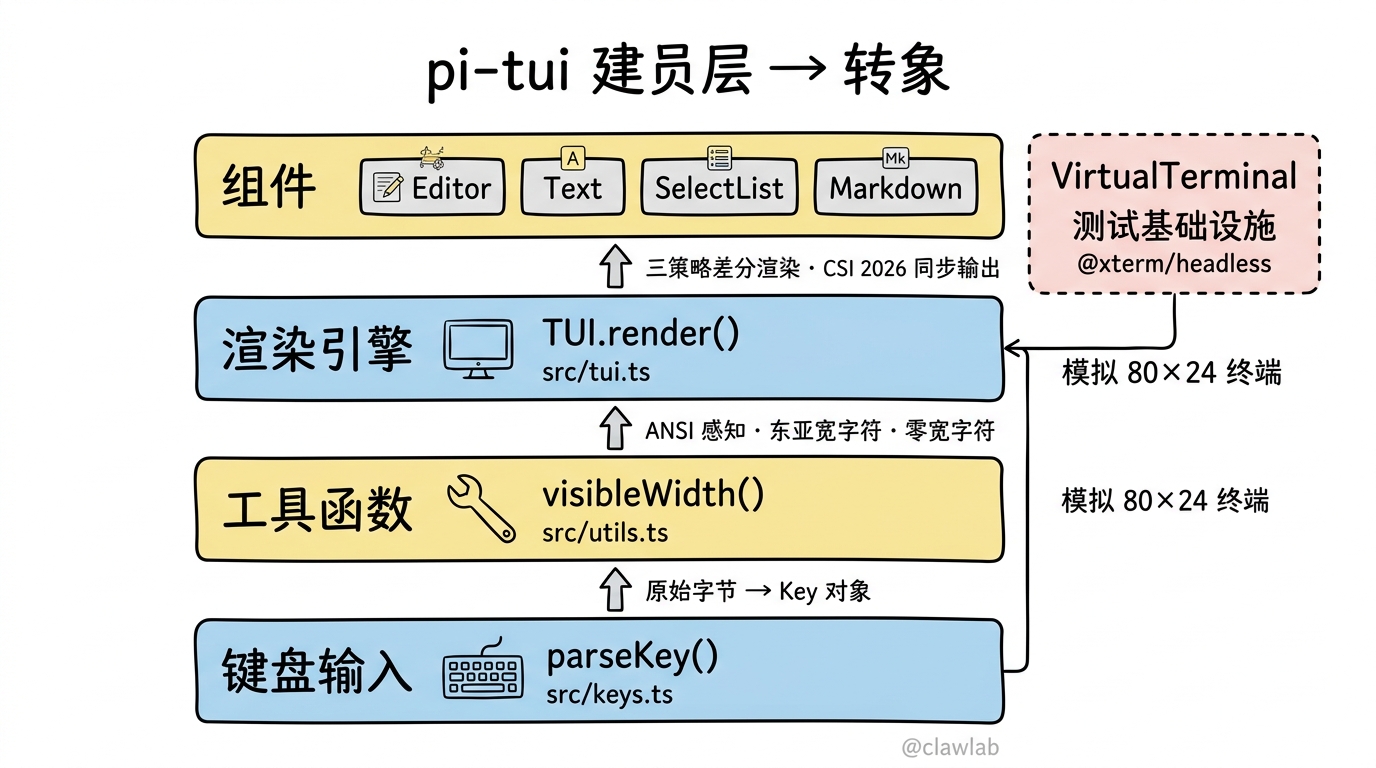
包路径:packages/tui/测试框架:node --test(Node.js 内置测试框架) 特殊依赖:@xterm/headless(VirtualTerminal 用于测试中模拟终端)
2.1 测试文件分类
tui 的所有测试都不需要 API Key,它们使用 VirtualTerminal(基于 @xterm/headless)模拟终端环境:
| 测试文件 | 测试内容 | 学习价值 |
|---|---|---|
keys.test.ts | 键盘输入解析(Kitty 协议、西里尔字母等) | 理解终端键盘输入底层机制 |
editor.test.ts | 编辑器组件(历史导航、自动补全、光标) | 理解复杂组件的实现 |
tui-render.test.ts | TUI 渲染引擎(resize、差分更新、样式) | 理解核心渲染机制 |
markdown.test.ts | Markdown 渲染(代码块、列表、样式) | 理解文本处理与 ANSI 输出 |
text.test.ts | Text 组件渲染 | 理解最基础的组件模型 |
utils.test.ts | visibleWidth、truncateToWidth 等 | 理解 ANSI 感知的字符串处理 |
select-list.test.ts | 列表选择组件 | 理解键盘交互组件 |
editor-cjk.test.ts | CJK 字符编辑 | 理解东亚宽字符处理 |
editor-bracketed-paste.test.ts | 粘贴处理 | 理解终端粘贴协议 |
fuzzy.test.ts | 模糊匹配算法 | 理解自动补全的核心算法 |
autocomplete.test.ts | 自动补全 Provider | 理解补全系统架构 |
stdin-buffer.test.ts | 输入缓冲 | 理解输入事件的批处理 |
2.2 交互式 Demo(可视化调试)
tui 包提供了多个可直接运行的交互式 Demo,非常适合可视化学习:
| Demo 文件 | 用途 | 运行命令 |
|---|---|---|
test/chat-simple.ts | 简单聊天界面 | npx tsx test/chat-simple.ts |
test/key-tester.ts | 键盘按键代码查看器 | npx tsx test/key-tester.ts |
test/image-test.ts | 终端图片渲染测试 | npx tsx test/image-test.ts [图片路径] |
2.3 运行命令
bash
cd packages/tui

# === 运行单元测试 ===

# 键盘输入解析测试
node --test --import tsx test/keys.test.ts

# 编辑器组件测试
node --test --import tsx test/editor.test.ts

# TUI 渲染引擎测试
node --test --import tsx test/tui-render.test.ts

# Markdown 渲染测试
node --test --import tsx test/markdown.test.ts

# 工具函数测试
node --test --import tsx test/utils.test.ts

# 模糊匹配测试
node --test --import tsx test/fuzzy.test.ts

# 运行全部测试
node --test --import tsx test/*.test.ts

# === 运行交互式 Demo ===

# 聊天界面 Demo(Ctrl+C 退出)
npx tsx test/chat-simple.ts

# 键盘测试器(Ctrl+C 退出)
npx tsx test/key-tester.ts

# 图片渲染测试
npx tsx test/image-test.ts /path/to/image.png
2.4 推荐的调试学习路径
第一步:工具函数(最基础)
bash
cd packages/tui

# 理解 ANSI 字符串的可见宽度计算
node --test --import tsx test/utils.test.ts
在 src/utils.ts 的 visibleWidth() 函数设断点,理解如何处理 ANSI 转义码、东亚宽字符、零宽字符。
第二步:键盘输入(终端交互基础)
bash
# 先运行 key-tester 看看真实按键产生什么序列
npx tsx test/key-tester.ts

# 然后运行测试,理解解析逻辑
node --test --import tsx test/keys.test.ts
在 src/keys.ts 的 parseKey() 函数设断点,观察不同按键序列是如何被解析为 Key 对象的。
第三步:渲染引擎(核心)
bash
node --test --import tsx test/tui-render.test.ts在 src/tui.ts 的 render() 方法(TUI 类的渲染循环)设断点,观察:
- 组件的
render(width)如何输出行数组 - 新旧行如何比较
- 哪些行需要更新
- CSI 2026 同步输出如何工作
第四步:交互式 Demo(完整体验)
bash
npx tsx test/chat-simple.ts在 demo 运行时,在 Editor 组件的 handleInput() 设断点,观察输入如何流转为 UI 更新。
2.5 关键源文件断点位置
| 文件 | 断点建议 | 观察目的 |
|---|---|---|
src/tui.ts TUI.render() | 渲染循环入口 | 理解三策略差分渲染 |
src/tui.ts TUI.handleInput() | 输入处理入口 | 理解输入→焦点组件的分发 |
src/keys.ts parseKey() | 键盘解析 | 理解原始字节→Key 对象 |
src/components/editor.ts handleInput() | 编辑器输入处理 | 理解复杂组件的交互逻辑 |
src/utils.ts visibleWidth() | 宽度计算 | 理解 ANSI 感知的文本处理 |
2.6 VirtualTerminal 的作用
test/virtual-terminal.ts 是测试的关键基础设施。它基于 @xterm/headless(xterm.js 的无头版本)实现了 Terminal 接口,允许在测试中:
- 模拟一个 80x24 的终端
- 写入 ANSI 控制序列并正确处理
- 读取终端 buffer 中的内容验证渲染结果
- 模拟键盘输入
- 检查单元格样式(粗体、斜体、颜色等)
理解 VirtualTerminal 是理解 tui 测试的前提。
三、pi-agent-core 调试
包路径:packages/agent/测试框架:vitest vitest 配置:globals: true, environment: "node", testTimeout: 30000
3.1 测试文件分类
不需要 API Key 的测试(使用 MockAssistantStream)
| 测试文件 | 测试内容 | 学习价值 |
|---|---|---|
agent.test.ts | Agent 类状态管理、事件订阅、prompt 执行 | 理解 Agent 类的完整生命周期 |
agent-loop.test.ts | Agent Loop 事件序列、工具调用、多轮循环 | 最核心,理解 Agent 循环机制 |
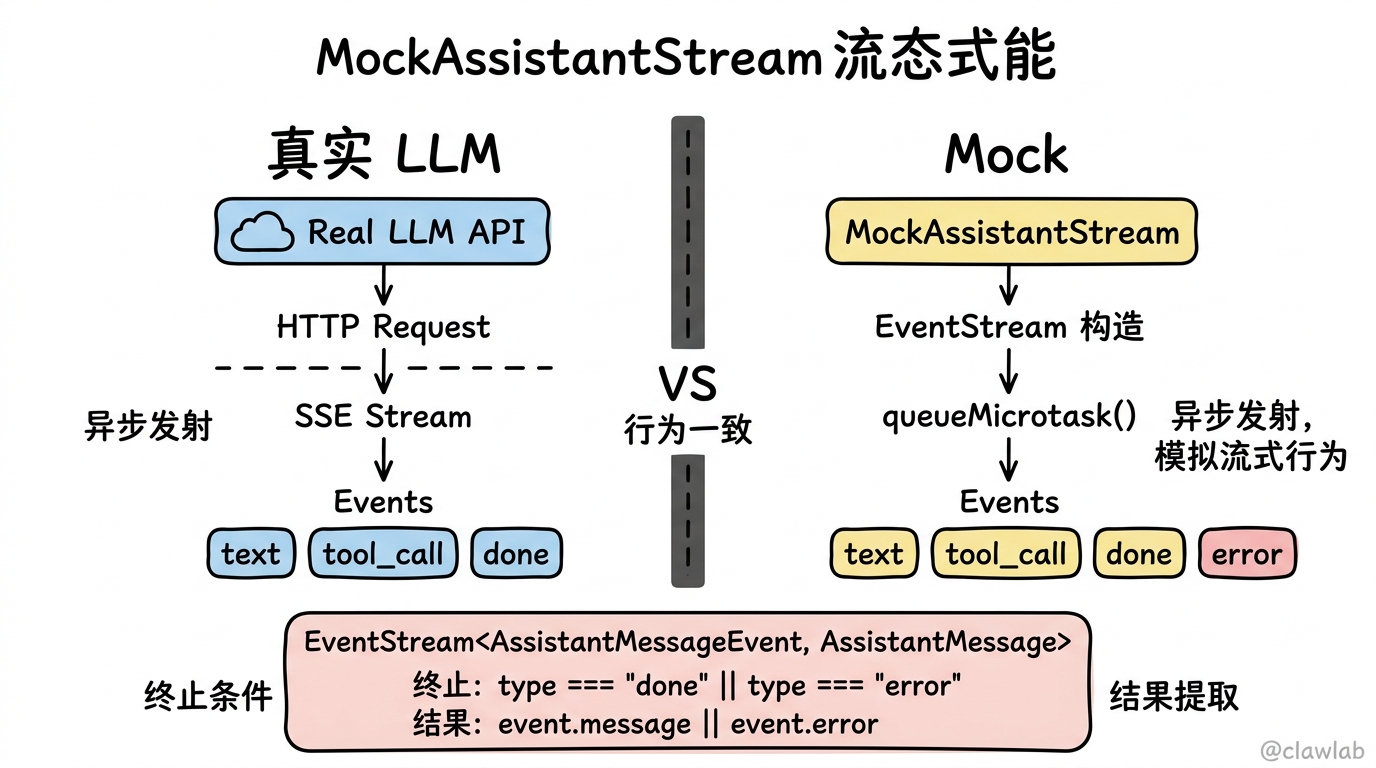
这两个文件使用 MockAssistantStream 模拟 LLM 响应,完全不需要网络或 API Key。
需要 API Key 的测试
| 测试文件 | 所需环境变量 | 测试内容 |
|---|---|---|
e2e.test.ts | 多个 Provider 的 Key | 端到端集成测试(带 skipIf) |
bedrock-models.test.ts | AWS Bedrock 凭证 | Bedrock 特定的模型测试 |
3.2 运行命令
bash
cd packages/agent

# 运行 Agent 类测试(不需要 API Key)
npx tsx ../../node_modules/vitest/dist/cli.js --run test/agent.test.ts

# 运行 Agent Loop 测试(不需要 API Key)
npx tsx ../../node_modules/vitest/dist/cli.js --run test/agent-loop.test.ts

# 运行 E2E 测试(需要 API Key,会自动跳过没有 Key 的 Provider)
OPENAI_API_KEY=sk-xxx npx tsx ../../node_modules/vitest/dist/cli.js --run test/e2e.test.ts
3.3 推荐的调试学习路径
第一步:Agent 类基础
bash
cd packages/agent
npx tsx ../../node_modules/vitest/dist/cli.js --run test/agent.test.ts
在以下位置设断点:
src/agent.ts的Agent构造函数 — 观察默认状态初始化src/agent.ts的prompt()方法 — 观察消息队列机制src/agent.ts的subscribe()— 观察事件发布/订阅
第二步:Agent Loop 核心循环
bash
npx tsx ../../node_modules/vitest/dist/cli.js --run test/agent-loop.test.ts这是最重要的调试目标。在以下位置设断点:
| 文件位置 | 观察目的 |
|---|---|
src/agent-loop.ts — runAgentLoop() 入口 | 理解循环的启动 |
src/agent-loop.ts — emit({ type: "agent_start" }) | 观察事件发射 |
src/agent-loop.ts — convertToLlm(messages) | 观察 AgentMessage → Message 转换 |
src/agent-loop.ts — streamFn(...) 调用点 | 观察 LLM 调用时机 |
src/agent-loop.ts — tool_call 处理分支 | 观察工具执行与结果注入 |
src/agent-loop.ts — 循环终止条件 | 理解何时退出循环 |
测试中的 Mock 机制:
agent-loop.test.ts 中的 MockAssistantStream 模拟了 LLM 的流式响应。理解它的工作方式是理解测试的关键:
typescript
class MockAssistantStream extends EventStream<AssistantMessageEvent, AssistantMessage> {
  constructor() {
    super(
      (event) => event.type === "done" || event.type === "error",  // 终止条件
      (event) => {                                                  // 结果提取
        if (event.type === "done") return event.message;
        if (event.type === "error") return event.error;
      },
    );
  }
}
通过 queueMicrotask() 异步发射事件,模拟真实的流式行为。
第三步:E2E 集成测试(需要 API Key)
bash
OPENAI_API_KEY=sk-xxx npx tsx ../../node_modules/vitest/dist/cli.js --run test/e2e.test.ts在 stream.ts(pi-ai 包)和 agent-loop.ts 同时设断点,观察完整的端到端调用链。
3.4 关键概念可视化
调试时重点观察这个事件序列:
agent_start
  → turn_start
    → message_start (user)
    → message_end (user)
    → [LLM 调用]
    → message_start (assistant)
    → message_update (streaming...)
    → message_end (assistant)
    → [如果有 tool_call]
      → tool_execution_start
      → tool_execution_end
      → message_start (toolResult)
      → message_end (toolResult)
  → turn_end
  → [如果有 tool_call,开始新 turn...]
  → turn_start
    → ...
  → turn_end
agent_end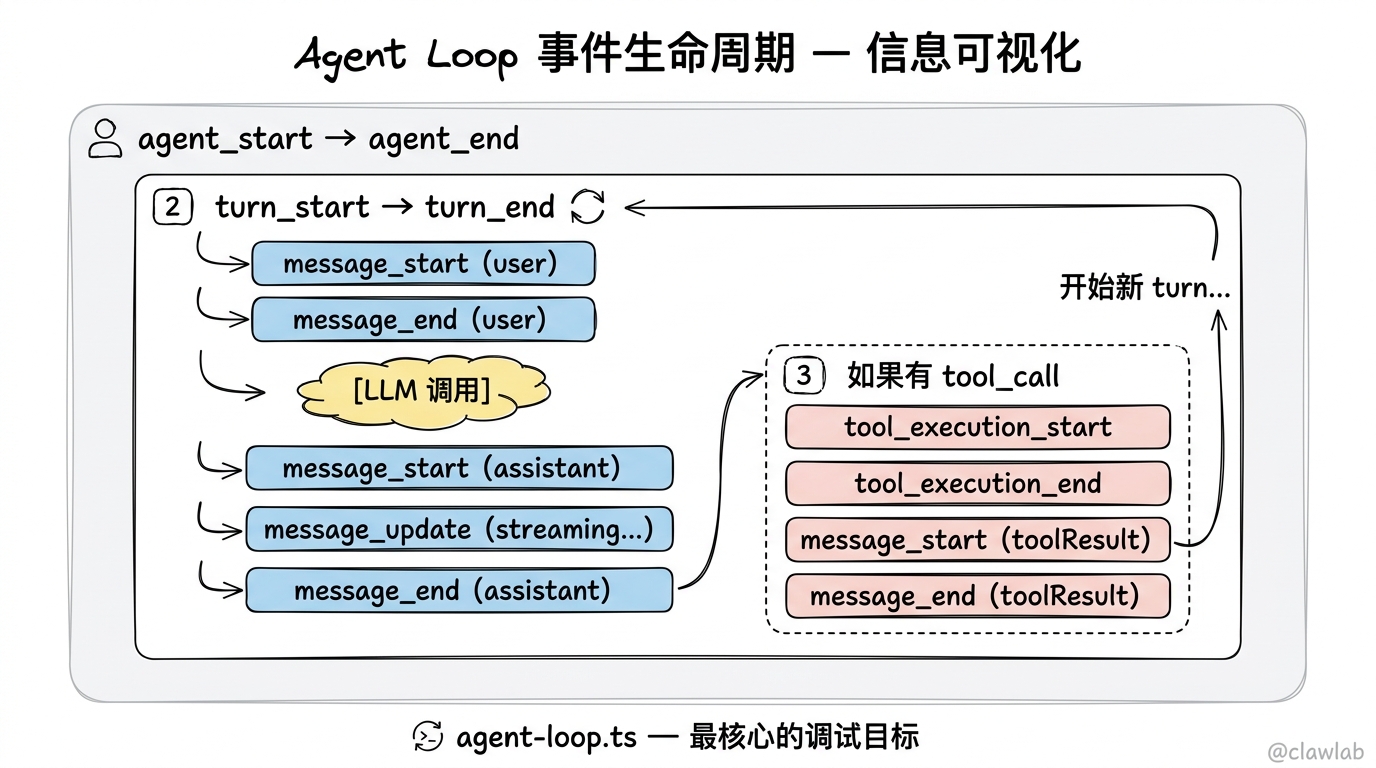
在 agent-loop.test.ts 中添加如下代码可以打印完整的事件序列:
typescript
const events: AgentEvent[] = [];
const stream = agentLoop([userPrompt], context, config);
for await (const event of stream) {
  events.push(event);
  console.log(`Event: ${event.type}`);
}
四、pi-coding-agent 调试
包路径:packages/coding-agent/测试框架:vitest vitest 配置:globals: true, environment: "node", testTimeout: 30000
这是最大的包(62 个测试文件),分类如下。
4.1 测试文件分类
不需要 API Key 的测试(推荐优先调试)
工具测试:
| 测试文件 | 测试内容 | 学习价值 |
|---|---|---|
tools.test.ts | 所有内置工具(read/write/edit/bash/grep/find/ls) | 强烈推荐 — 理解 Agent 工具的实现 |
file-mutation-queue.test.ts | 文件修改队列的串行化 | 理解并发文件操作的安全性 |
path-utils.test.ts | 路径工具函数 | 理解路径解析和安全校验 |
核心逻辑测试:
| 测试文件 | 测试内容 | 学习价值 |
|---|---|---|
test-harness.test.ts | 测试辅助框架自身的验证 | 推荐先读 — 理解 mock 机制 |
compaction.test.ts | 上下文压缩逻辑(纯逻辑部分不需要 Key) | 理解压缩策略 |
compaction-serialization.test.ts | 压缩数据序列化 | 理解压缩数据持久化 |
compaction-summary-reasoning.test.ts | 压缩摘要推理 | 理解摘要生成逻辑 |
system-prompt.test.ts | 系统提示词构建 | 理解提示词组装逻辑 |
model-resolver.test.ts | 模型解析 | 理解模型选择机制 |
model-registry.test.ts | 模型注册表 | 理解自定义 Provider 注册 |
会话管理测试:
| 测试文件 | 测试内容 | 学习价值 |
|---|---|---|
settings-manager.test.ts | 设置管理器 | 理解配置持久化 |
settings-manager-bug.test.ts | 设置管理器 bug 修复 | 理解边界情况 |
auth-storage.test.ts | 认证存储 | 理解凭证管理 |
session-selector-rename.test.ts | 会话重命名 | 理解会话管理 |
session-selector-search.test.ts | 会话搜索 | 理解会话检索 |
session-selector-path-delete.test.ts | 会话路径删除 | 理解会话清理 |
session-info-modified-timestamp.test.ts | 会话时间戳 | 理解会话元数据 |
sdk-session-manager.test.ts | SDK 会话管理 | 理解 SDK 层会话 API |
扩展系统测试:
| 测试文件 | 测试内容 | 学习价值 |
|---|---|---|
extensions-runner.test.ts | 扩展运行器 | 理解扩展的执行机制 |
extensions-discovery.test.ts | 扩展发现 | 理解扩展的加载流程 |
extensions-input-event.test.ts | 扩展输入事件 | 理解扩展的事件拦截 |
resource-loader.test.ts | 资源加载器 | 理解统一的资源加载 |
其他测试:
| 测试文件 | 测试内容 |
|---|---|
args.test.ts | CLI 参数解析 |
skills.test.ts | 技能系统 |
sdk-skills.test.ts | SDK 技能 API |
prompt-templates.test.ts | 提示词模板 |
frontmatter.test.ts | Frontmatter 解析 |
initial-message.test.ts | 初始消息构建 |
plan-mode-utils.test.ts | Plan 模式工具 |
rpc-jsonl.test.ts | RPC JSON-L 协议 |
footer-data-provider.test.ts | 底栏数据 |
footer-width.test.ts | 底栏宽度 |
tree-selector.test.ts | 文件树选择器 |
truncate-to-width.test.ts | 文本截断 |
git-ssh-url.test.ts | Git SSH URL 解析 |
git-update.test.ts | Git 更新 |
image-processing.test.ts | 图片处理 |
image-resize-callers.test.ts | 图片缩放 |
clipboard-image.test.ts | 剪贴板图片 |
clipboard-image-bmp-conversion.test.ts | BMP 转换 |
block-images.test.ts | 图片阻止 |
package-manager.test.ts | 包管理器 |
package-manager-ssh.test.ts | SSH 包管理 |
package-command-paths.test.ts | 包命令路径 |
keybindings-migration.test.ts | 快捷键迁移 |
interactive-mode-status.test.ts | 交互模式状态 |
interactive-mode-suspend.test.ts | 交互模式挂起 |
tool-execution-component.test.ts | 工具执行组件 |
stdout-cleanliness.test.ts | stdout 干净度 |
bash-close-hang-windows.test.ts | Windows bash 挂起(仅 Windows) |
Agent Session mock 测试:
| 测试文件 | 测试内容 | 学习价值 |
|---|---|---|
agent-session-retry.test.ts | 重试机制 | 理解错误恢复 |
agent-session-concurrent.test.ts | 并发 prompt | 理解并发安全 |
agent-session-auto-compaction-queue.test.ts | 自动压缩队列 | 理解压缩触发 |
agent-session-dynamic-tools.test.ts | 动态工具 | 理解运行时工具变更 |
agent-session-dynamic-provider.test.ts | 动态 Provider | 理解运行时 Provider 切换 |
agent-session-model-switch-thinking.test.ts | 模型切换思考 | 理解模型热切换 |
需要 API Key 的测试
| 测试文件 | 所需环境变量 | 测试内容 |
|---|---|---|
agent-session-branching.test.ts | ANTHROPIC_API_KEY | 会话分叉 |
agent-session-compaction.test.ts | ANTHROPIC_API_KEY | 压缩 E2E |
agent-session-tree-navigation.test.ts | ANTHROPIC_API_KEY | 树导航 E2E |
compaction-thinking-model.test.ts | ANTHROPIC_API_KEY | 思考模型压缩 |
compaction-extensions.test.ts | ANTHROPIC_API_KEY | 压缩扩展 |
compaction-extensions-example.test.ts | ANTHROPIC_API_KEY | 压缩扩展示例 |
rpc.test.ts | ANTHROPIC_API_KEY | RPC 模式 |
4.2 Test Harness — 核心 Mock 机制
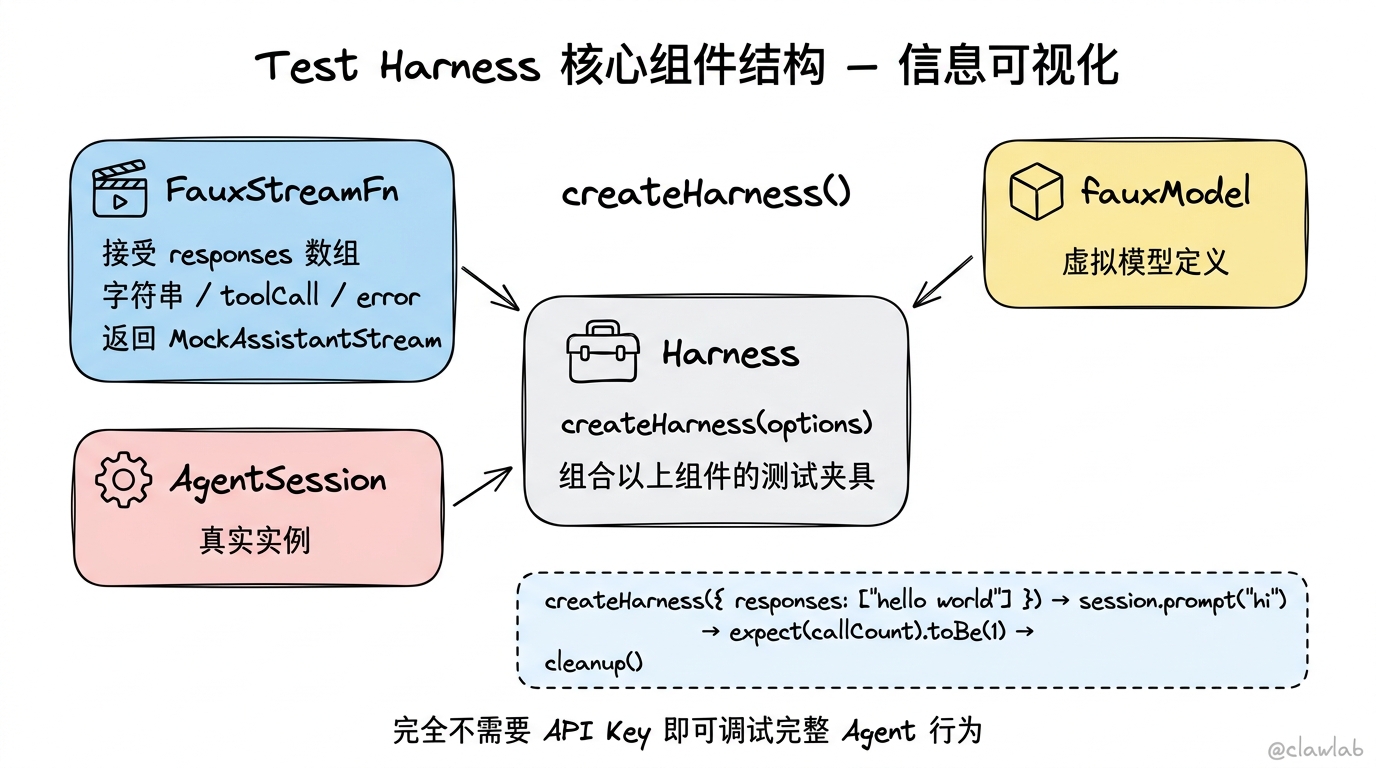
test/test-harness.ts 是 coding-agent 测试的核心基础设施,理解它是调试的前提。
关键组件:
createHarness(options)
    ├─ FauxStreamFn — 模拟 LLM 的流式响应函数
    │   ├─ 接受 responses 数组(字符串 / toolCall / error)
    │   └─ 返回 MockAssistantStream
    ├─ fauxModel — 虚拟模型定义
    ├─ AgentSession — 真实的 AgentSession 实例
└─ Harness — 组合以上组件的测试夹具使用示例:
typescript
// 创建一个会回复 "hello world" 的 mock Agent
const harness = createHarness({ responses: ["hello world"] });

// 发送 prompt 并等待完成
await harness.session.prompt("hi");

// 检查结果
expect(harness.faux.callCount).toBe(1);

// 清理
harness.cleanup();这意味着你可以完全不需要 API Key 就能调试 Agent 的完整行为,包括工具调用、重试、错误处理等。
4.3 运行命令
bash
cd packages/coding-agent

# ========= 推荐最先运行的测试 =========

# Test Harness 本身的验证(理解 mock 机制)
npx tsx ../../node_modules/vitest/dist/cli.js --run test/test-harness.test.ts

# 工具测试(理解 read/write/edit/bash 的实现)
npx tsx ../../node_modules/vitest/dist/cli.js --run test/tools.test.ts

# 系统提示词构建(理解提示词组装)
npx tsx ../../node_modules/vitest/dist/cli.js --run test/system-prompt.test.ts

# ========= 核心逻辑测试 =========

# 上下文压缩(纯逻辑部分)
npx tsx ../../node_modules/vitest/dist/cli.js --run test/compaction.test.ts

# 扩展系统
npx tsx ../../node_modules/vitest/dist/cli.js --run test/extensions-runner.test.ts
npx tsx ../../node_modules/vitest/dist/cli.js --run test/extensions-discovery.test.ts

# 会话管理
npx tsx ../../node_modules/vitest/dist/cli.js --run test/settings-manager.test.ts
npx tsx ../../node_modules/vitest/dist/cli.js --run test/auth-storage.test.ts

# Agent Session mock 测试
npx tsx ../../node_modules/vitest/dist/cli.js --run test/agent-session-retry.test.ts
npx tsx ../../node_modules/vitest/dist/cli.js --run test/agent-session-concurrent.test.ts
npx tsx ../../node_modules/vitest/dist/cli.js --run test/agent-session-dynamic-tools.test.ts

# ========= 需要 API Key =========

ANTHROPIC_API_KEY=sk-xxx npx tsx ../../node_modules/vitest/dist/cli.js --run test/agent-session-branching.test.ts
4.4 SDK 示例调试
SDK 示例是理解 coding-agent 对外 API 的最佳方式(需要 API Key):
bash
cd packages/coding-agent

# 最简示例 — 理解 createAgentSession
npx tsx examples/sdk/01-minimal.ts

# 工具配置 — 理解工具选择与 cwd 绑定
npx tsx examples/sdk/05-tools.ts

# 扩展系统 — 理解 Extension API
npx tsx examples/sdk/06-extensions.ts

# 完整列表:
# 01-minimal.ts       — 最简用法
# 02-model.ts         — 模型选择
# 03-prompts.ts       — 提示词配置
# 04-sessions.ts      — 会话持久化
# 05-tools.ts         — 工具配置
# 06-extensions.ts    — 扩展系统
# 07-events.ts        — 事件监听
# 08-print-mode.ts    — 打印模式
# 09-thinking.ts      — 思考等级
# 10-custom-model.ts  — 自定义模型
# 11-rpc-client.ts    — RPC 客户端
# 12-full-control.ts  — 完全控制
4.5 推荐的调试学习路径
1. test-harness.test.ts      → 理解 mock 机制
2. tools.test.ts             → 理解四大工具
3. system-prompt.test.ts     → 理解提示词构建
4. compaction.test.ts        → 理解上下文压缩
5. extensions-runner.test.ts → 理解扩展系统
6. agent-session-retry.test.ts → 理解 AgentSession 错误恢复
7. examples/sdk/01-minimal.ts  → 理解完整 SDK 用法(需要 Key)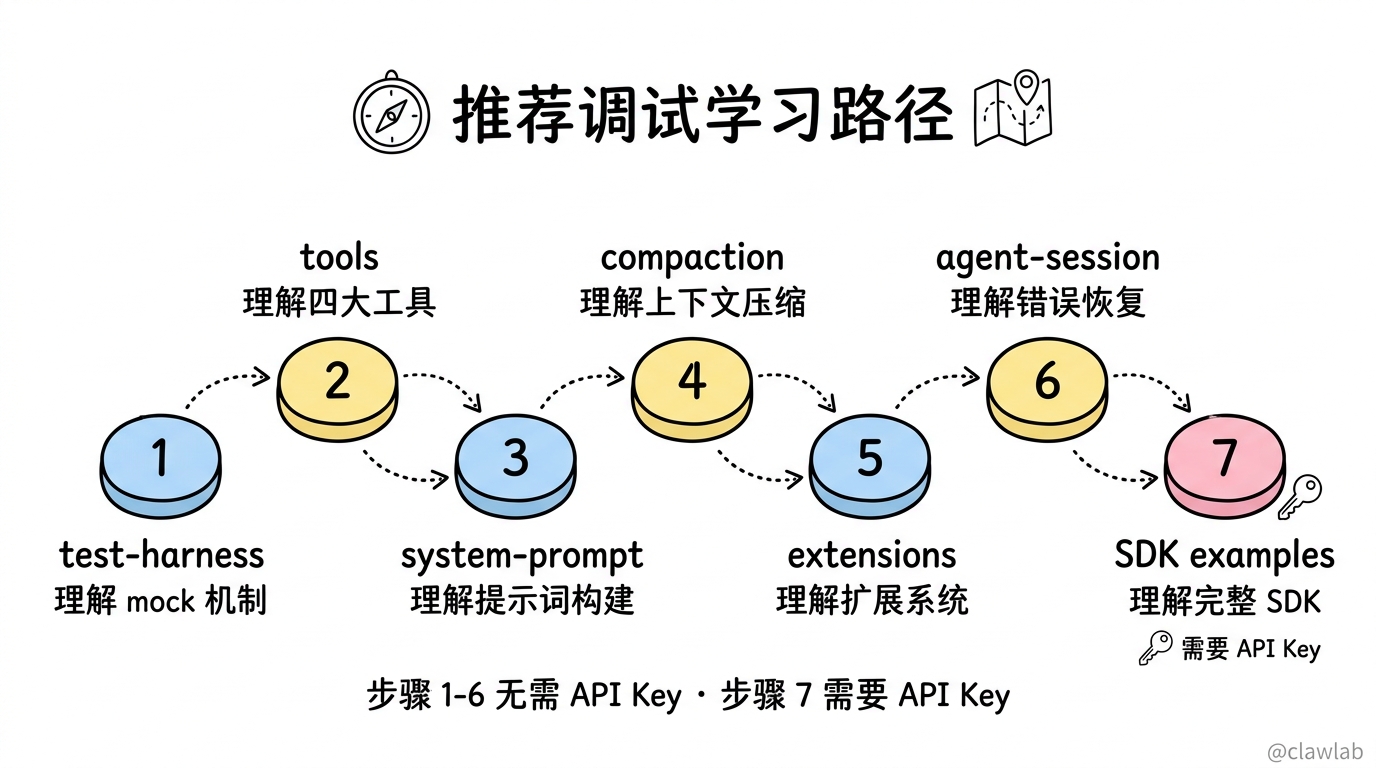
4.6 关键源文件断点位置
| 文件 | 断点建议 | 观察目的 |
|---|---|---|
src/core/sdk.ts — createAgentSession() | SDK 工厂入口 | 理解初始化全流程 |
src/core/agent-session.ts — prompt() | 消息发送入口 | 理解消息队列 |
src/core/system-prompt.ts — buildSystemPrompt() | 系统提示词组装 | 理解提示词结构 |
src/core/tools/read.ts — execute() | read 工具执行 | 理解工具的输入输出 |
src/core/tools/edit.ts — execute() | edit 工具执行 | 理解 search-and-replace |
src/core/tools/bash.ts — execute() | bash 工具执行 | 理解命令执行安全性 |
src/core/compaction/compaction.ts — compact() | 压缩主逻辑 | 理解压缩策略 |
src/core/extensions/runner.ts — emit() | 扩展事件分发 | 理解 hook 机制 |
test/test-harness.ts — createFauxStreamFn() | Mock 流函数 | 理解 mock 如何模拟 LLM |
五、pi-web-ui 调试
包路径:packages/web-ui/测试框架:无自动化测试 调试方式:Vite dev server + 浏览器 DevTools
5.1 启动示例应用
bash
cd packages/web-ui/example

# 安装依赖(如果还没装)
npm install

# 启动开发服务器
npm run dev
默认会在 http://localhost:5173 启动。
5.2 示例应用架构
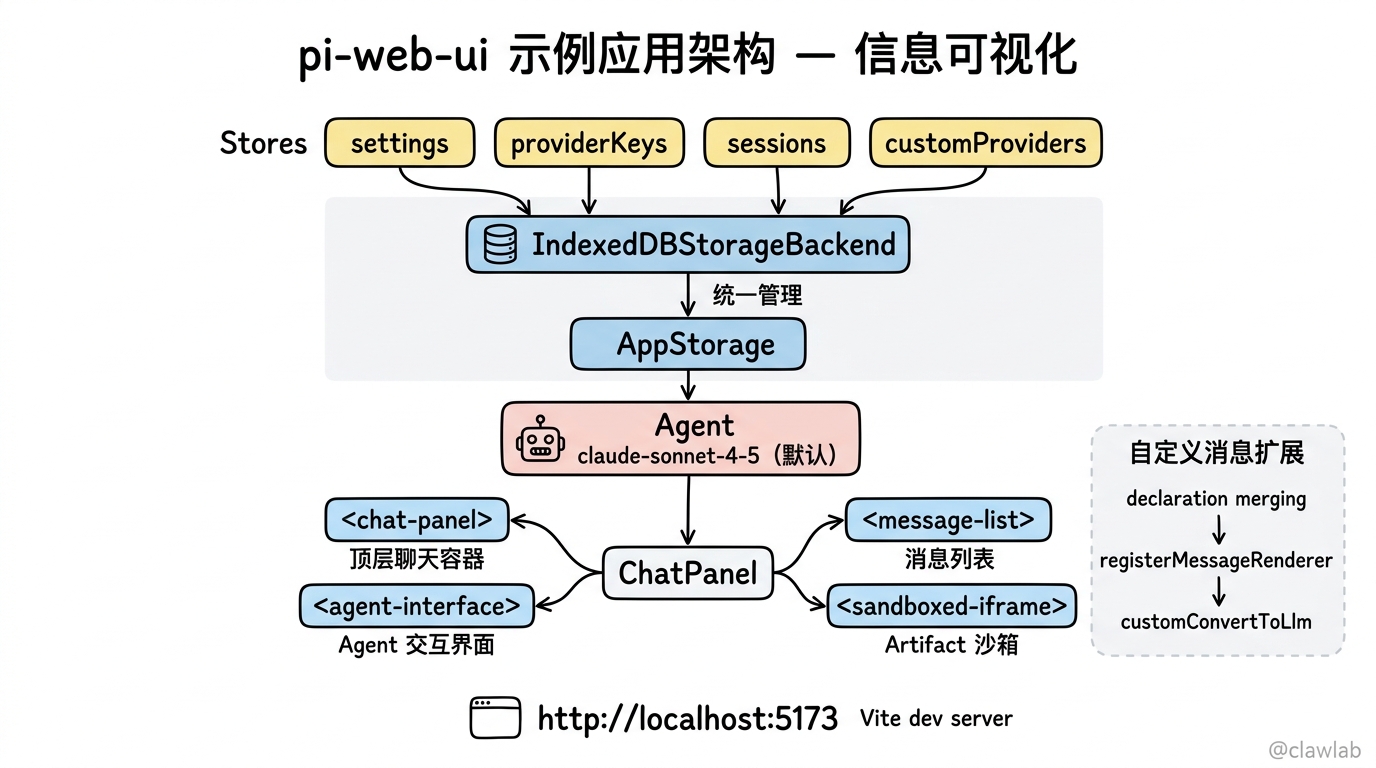
示例应用 (packages/web-ui/example/) 是一个完整的 AI 聊天应用,展示了 web-ui 包的所有核心功能:
入口:example/src/main.ts
初始化流程:
- 创建四个 Store(settings, providerKeys, sessions, customProviders)
- 创建
IndexedDBStorageBackend - 创建
AppStorage统一管理 - 创建
Agent(默认使用 claude-sonnet-4-5) - 创建
ChatPanel组件 - 渲染 UI(使用 lit 的
html模板)
功能演示:
- 聊天会话管理(新建 / 历史 / 加载)
- 自定义消息类型(SystemNotification — 通过 declaration merging 扩展)
- API Key 对话框
- 模型选择
- 设置面板
- 自动保存到 IndexedDB
5.3 调试方式
方式一:浏览器 DevTools
- 启动
npm run dev - 打开
http://localhost:5173 - 打开浏览器 DevTools (F12)
- 在 Sources 面板中找到
src/目录下的源文件 - 直接在浏览器中设断点
推荐断点位置:
main.ts—createAgent()函数:观察 Agent 初始化main.ts— Agent subscribe 回调:观察事件流main.ts—saveSession()函数:观察 IndexedDB 持久化
方式二:查看 Web Components 源码
在浏览器 DevTools 的 Elements 面板,找到以下自定义元素:
| 元素 | 对应源文件 | 职责 |
|---|---|---|
<chat-panel> | ChatPanel.ts | 顶层聊天容器 |
<agent-interface> | components/AgentInterface.ts | Agent 交互界面 |
<message-list> | components/MessageList.ts | 消息列表 |
<sandboxed-iframe> | components/SandboxedIframe.ts | Artifact 沙箱 |
方式三:IndexedDB 调试
在浏览器 DevTools → Application → Storage → IndexedDB → pi-web-ui-example,可以直接查看:
settings— 用户设置provider-keys— API Key 存储sessions— 会话数据custom-providers— 自定义 Provider
5.4 自定义消息类型示例
example/src/custom-messages.ts 展示了 web-ui 最强大的扩展机制——通过 TypeScript declaration merging 添加自定义消息类型:
typescript
// 1. 定义自定义消息接口
interface SystemNotificationMessage {
  role: "system-notification";
  message: string;
  variant: "default" | "destructive";
  timestamp: string;
}

// 2. 通过 declaration merging 注册到类型系统
declare module "@mariozechner/pi-agent-core" {
  interface CustomAgentMessages {
    "system-notification": SystemNotificationMessage;
  }
}

// 3. 创建渲染器
const renderer: MessageRenderer<SystemNotificationMessage> = {
  render: (msg) => html`<div>${msg.message}</div>`,
};

// 4. 注册渲染器
registerMessageRenderer("system-notification", renderer);

// 5. 自定义 convertToLlm(过滤自定义消息,不发送给 LLM)
function customConvertToLlm(messages: AgentMessage[]): Message[] {
  return defaultConvertToLlm(
    messages.filter((m) => m.role !== "system-notification")
  );
}
在断点调试这个流程,可以深入理解 web-ui 的消息扩展机制。
5.5 推荐的调试学习路径
1. 启动 example/npm run dev,浏览整体界面
2. 在 DevTools 中检查 IndexedDB 存储结构
3. 在 main.ts 的 createAgent() 设断点,理解初始化
4. 发送一条消息,观察 Agent subscribe 回调中的事件流
5. 查看 custom-messages.ts,理解自定义消息扩展
6. 在 ChatPanel.ts 源码中设断点,理解组件渲染
7. 检查 SandboxedIframe,理解 Artifact 的沙箱机制
5.6 不需要 API Key 的调试场景
即使没有 API Key,你仍然可以:
- 启动应用并查看 UI 结构
- 查看 IndexedDB 存储机制
- 研究自定义消息类型的 declaration merging
- 查看组件的渲染逻辑
- 测试 API Key 输入对话框的流程
但如果要真正发送消息并看到 Agent 回复,需要至少配置一个 Provider 的 API Key。
附录 A:VSCode 调试配置模板
在 monorepo 根目录创建 .vscode/launch.json:
json
{
  "version": "0.2.0",
  "configurations": [
    {
      "name": "Debug pi-ai test (vitest)",
      "type": "node",
      "request": "launch",
      "runtimeExecutable": "npx",
      "runtimeArgs": [
        "tsx",
        "../../node_modules/vitest/dist/cli.js",
        "--run",
        "--no-file-parallelism",
        "${file}"
      ],
      "cwd": "${workspaceFolder}/packages/ai",
      "console": "integratedTerminal",
      "env": {
        "OPENAI_API_KEY": "${env:OPENAI_API_KEY}",
        "ANTHROPIC_API_KEY": "${env:ANTHROPIC_API_KEY}",
        "GEMINI_API_KEY": "${env:GEMINI_API_KEY}"
      },
      "skipFiles": ["<node_internals>/**"]
    },
    {
      "name": "Debug pi-agent test (vitest)",
      "type": "node",
      "request": "launch",
      "runtimeExecutable": "npx",
      "runtimeArgs": [
        "tsx",
        "../../node_modules/vitest/dist/cli.js",
        "--run",
        "--no-file-parallelism",
        "${file}"
      ],
      "cwd": "${workspaceFolder}/packages/agent",
      "console": "integratedTerminal",
      "env": {
        "OPENAI_API_KEY": "${env:OPENAI_API_KEY}"
      },
      "skipFiles": ["<node_internals>/**"]
    },
    {
      "name": "Debug pi-tui test (node --test)",
      "type": "node",
      "request": "launch",
      "runtimeArgs": [
        "--test",
        "--import",
        "tsx",
        "${file}"
      ],
      "cwd": "${workspaceFolder}/packages/tui",
      "console": "integratedTerminal",
      "skipFiles": ["<node_internals>/**"]
    },
    {
      "name": "Debug pi-tui demo",
      "type": "node",
      "request": "launch",
      "runtimeExecutable": "npx",
      "runtimeArgs": [
        "tsx",
        "${file}"
      ],
      "cwd": "${workspaceFolder}/packages/tui",
      "console": "externalTerminal",
      "skipFiles": ["<node_internals>/**"]
    },
    {
      "name": "Debug pi-coding-agent test (vitest)",
      "type": "node",
      "request": "launch",
      "runtimeExecutable": "npx",
      "runtimeArgs": [
        "tsx",
        "../../node_modules/vitest/dist/cli.js",
        "--run",
        "--no-file-parallelism",
        "${file}"
      ],
      "cwd": "${workspaceFolder}/packages/coding-agent",
      "console": "integratedTerminal",
      "env": {
        "ANTHROPIC_API_KEY": "${env:ANTHROPIC_API_KEY}"
      },
      "skipFiles": ["<node_internals>/**"]
    },
    {
      "name": "Debug pi-coding-agent SDK example",
      "type": "node",
      "request": "launch",
      "runtimeExecutable": "npx",
      "runtimeArgs": [
        "tsx",
        "${file}"
      ],
      "cwd": "${workspaceFolder}/packages/coding-agent",
      "console": "integratedTerminal",
      "env": {
        "OPENAI_API_KEY": "${env:OPENAI_API_KEY}",
        "ANTHROPIC_API_KEY": "${env:ANTHROPIC_API_KEY}"
      },
      "skipFiles": ["<node_internals>/**"]
    }
  ]
}使用方式:
- 在 VSCode 中打开要调试的测试文件
- 在源码中设置断点
- 按 F5 选择对应的调试配置
- 调试器会停在断点处
注意:tui demo 建议使用
externalTerminal,因为 TUI 需要真实的终端环境。
附录 B:API Key 配置参考
环境变量设置
在 shell profile(~/.zshrc 或 ~/.bashrc)中添加:
bash
# 推荐至少配置一个(OpenAI 或 Anthropic)
export OPENAI_API_KEY="sk-..."
export ANTHROPIC_API_KEY="sk-ant-..."

# 可选
export GEMINI_API_KEY="..."
export XAI_API_KEY="..."
export GROQ_API_KEY="..."
export MISTRAL_API_KEY="..."
临时设置(单次运行)
bash
OPENAI_API_KEY=sk-xxx npx tsx ../../node_modules/vitest/dist/cli.js --run test/stream.test.ts.env 文件方式
在包根目录创建 .env 文件(vitest 会自动加载):
OPENAI_API_KEY=sk-...
ANTHROPIC_API_KEY=sk-ant-...
注意:
.env文件已在.gitignore中,不会被提交。
附录 C:常见问题排查
问题 1:测试报错 "Cannot find module"
原因:没有先构建。 解决:
bash
cd /Users/bytedance/Desktop/ai-study/pi-mono
npm run build
问题 2:tui 测试报错 "Cannot use import statement outside a module"
原因:缺少 tsx loader。 解决:确保使用 --import tsx 参数:
bash
node --test --import tsx test/keys.test.ts问题 3:vitest 测试超时
原因:默认 30 秒超时,部分集成测试(特别是带 API 调用的)可能需要更长时间。 解决:
bash
npx tsx ../../node_modules/vitest/dist/cli.js --run --testTimeout=60000 test/stream.test.ts问题 4:web-ui example 启动失败
原因:可能缺少 example 的依赖。 解决:
bash
cd packages/web-ui/example
npm install
npm run dev
问题 5:API Key 相关的测试全部跳过
原因:没有设置对应的环境变量。 预期行为:这是正常的——带 skipIf 的测试会在缺少 Key 时自动跳过,不会报错。如果你只想运行纯逻辑测试,这些跳过是完全正确的。
问题 6:断点不生效
可能原因:
- 断点设在了编译后的
.js文件而不是源.ts文件 - source map 没有正确生成
- 使用了
console模式而不是integratedTerminal
解决:
- 确保断点设在
src/目录下的.ts文件 - VSCode 配置中添加
"skipFiles": ["<node_internals>/**"] - 使用
integratedTerminal作为控制台类型
快速开始清单
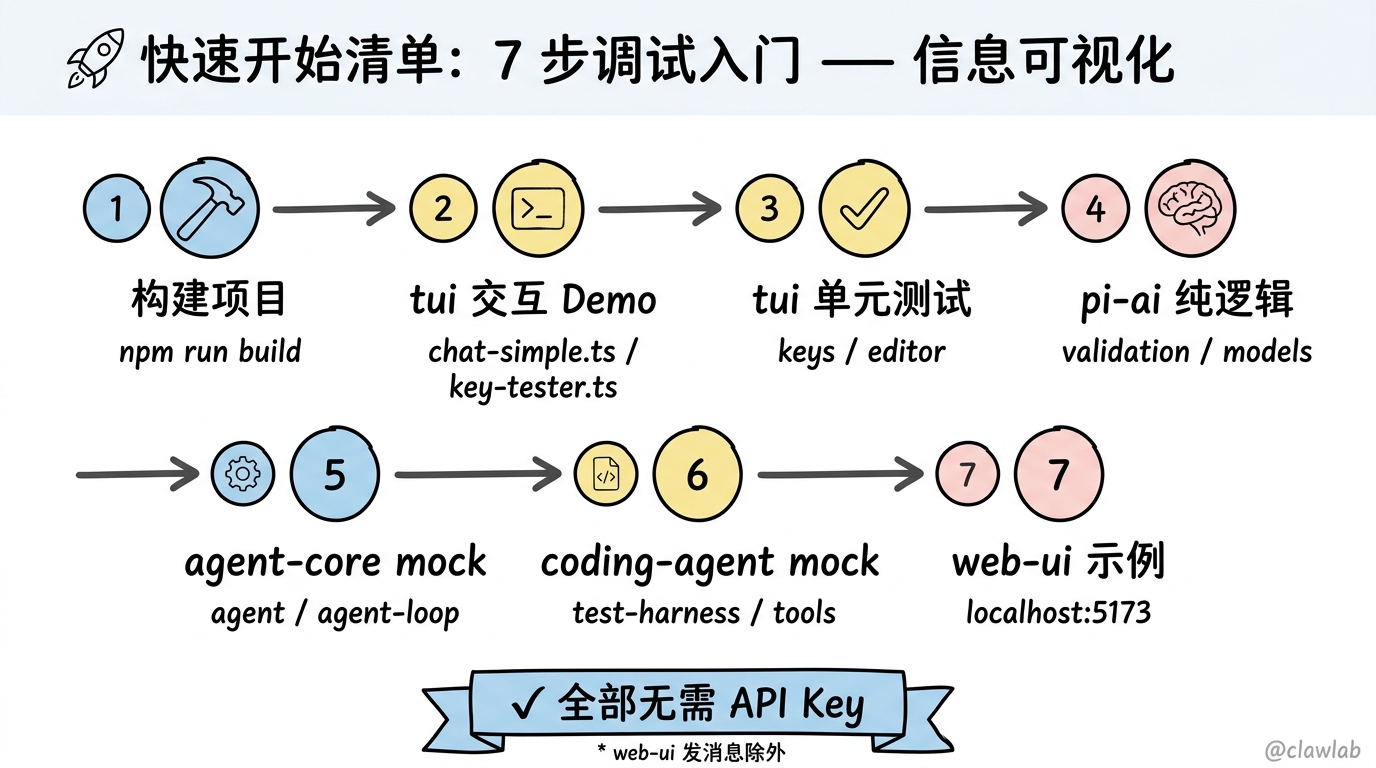
如果你想现在就开始调试,按以下顺序执行:
bash
# 1. 构建项目
cd /Users/bytedance/Desktop/ai-study/pi-mono
npm run build

# 2. 从 tui 开始 — 最直观,不需要 API Key
cd packages/tui
npx tsx test/chat-simple.ts    # 看看交互式界面长什么样
npx tsx test/key-tester.ts     # 按按键看看终端接收到什么

# 3. tui 单元测试
node --test --import tsx test/keys.test.ts
node --test --import tsx test/editor.test.ts

# 4. pi-ai 纯逻辑测试
cd ../ai
npx tsx ../../node_modules/vitest/dist/cli.js --run test/validation.test.ts
npx tsx ../../node_modules/vitest/dist/cli.js --run test/lazy-module-load.test.ts
npx tsx ../../node_modules/vitest/dist/cli.js --run test/models.test.ts

# 5. agent-core mock 测试
cd ../agent
npx tsx ../../node_modules/vitest/dist/cli.js --run test/agent.test.ts
npx tsx ../../node_modules/vitest/dist/cli.js --run test/agent-loop.test.ts

# 6. coding-agent mock 测试
cd ../coding-agent
npx tsx ../../node_modules/vitest/dist/cli.js --run test/test-harness.test.ts
npx tsx ../../node_modules/vitest/dist/cli.js --run test/tools.test.ts
npx tsx ../../node_modules/vitest/dist/cli.js --run test/system-prompt.test.ts

# 7. web-ui 示例应用
cd ../web-ui/example
npm run dev
# 打开 http://localhost:5173以上所有命令都不需要 API Key(web-ui 启动后发消息需要 Key,但查看 UI 结构不需要)。