主题
LangChain 教程 29|Agent Chat UI:快速搭建聊天界面
📖 本篇导读:这是 LangChain 系列教程的第 29 篇。本篇将深入讲解如何使用 Agent Chat UI 快速搭建专业的聊天界面,包括流式显示、工具调用渲染、人机协作等功能。读完预计需要 10 分钟。
简单来说
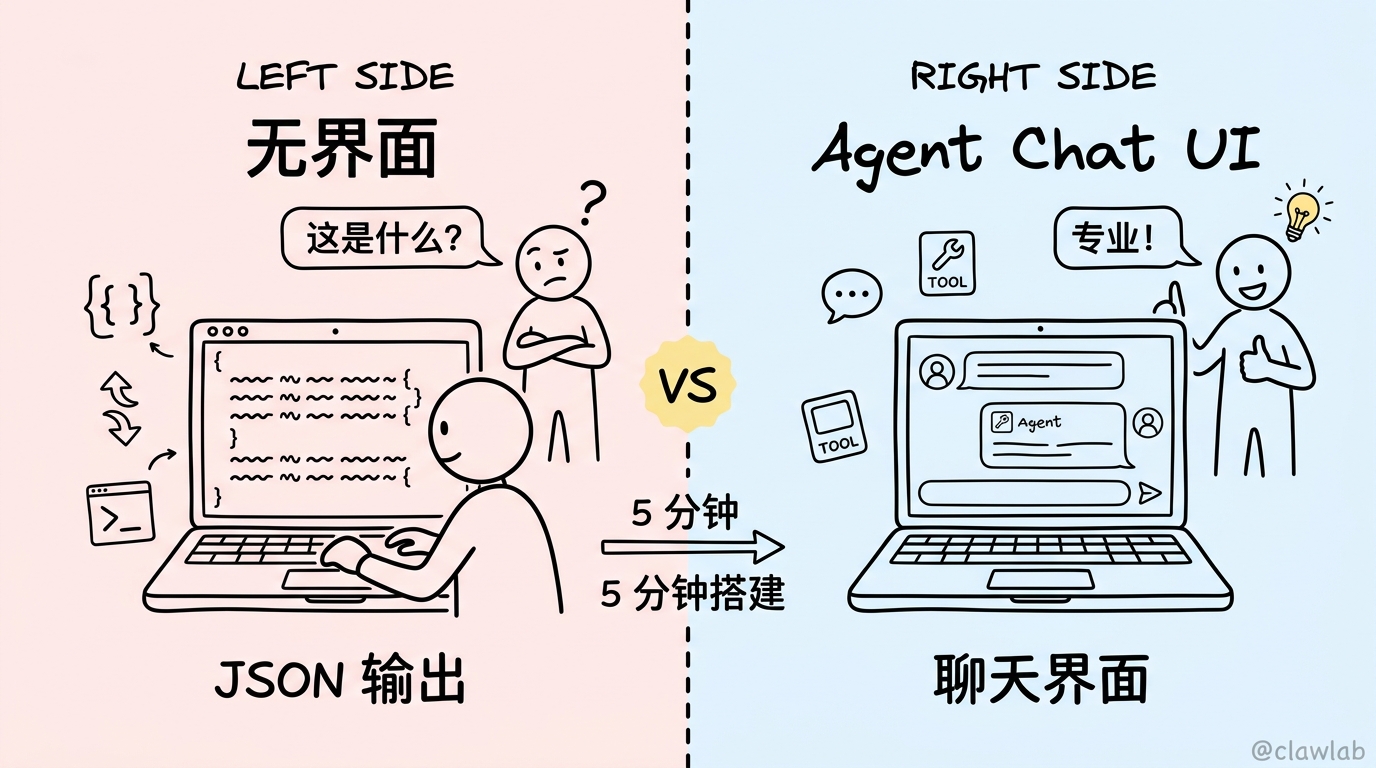
你花了好几天开发了一个超强的 Agent,功能完美、测试通过。现在老板说:"给我看看效果。"
你打开终端,输入命令,一堆 JSON 在屏幕上滚动...
老板:😐 "这是什么?"
问题很明显:Agent 再强大,没有用户界面就无法展示。
Agent Chat UI 解决的就是这个问题 —— 5 分钟搭建一个专业的聊天界面:
┌─────────────────────────────────────────────────┐
│  🤖 My Agent                                    │
├─────────────────────────────────────────────────┤
│                                                 │
│  👤 帮我查一下北京的天气                          │
│                                                 │
│  🤖 [正在调用 get_weather 工具...]              │
│     参数: { city: "北京" }                       │
│                                                 │
│  🤖 北京今天天气晴朗,温度 25°C,适合外出。       │
│                                                 │
├─────────────────────────────────────────────────┤
│  输入消息...                              [发送] │
└─────────────────────────────────────────────────┘
本节目标
- 理解 Agent Chat UI 的价值和功能
- 学会使用托管版本快速连接 Agent
- 掌握本地开发和自定义界面
- 了解工具调用可视化和中断处理
业务场景
假设你开发了一个股票分析 Agent:
typescript
const stockAgent = createAgent({
  model: "gpt-4.1",
  tools: [getStockPrice, analyzeStock, getNews],
  systemPrompt: "你是股票分析专家..."
});
现在你需要:
- 给老板演示 —— 需要一个好看的界面
- 给团队测试 —— 需要方便地输入测试用例
- 给用户使用 —— 需要一个正式的产品界面
用 Agent Chat UI,这些需求都能满足。
快速开始:托管版本
最快的方式 —— 直接使用在线托管版本:
Step 1:访问托管版本
Step 2:连接你的 Agent
输入连接信息:
- Graph ID:你的 Agent 名称(在
langgraph.json的graphs中定义) - Deployment URL:Agent 服务器地址
- 本地开发:
http://localhost:2024 - 部署环境:你的部署 URL
- 本地开发:
- LangSmith API Key(可选):用于认证
Step 3:开始聊天
配置完成后,直接在界面中与 Agent 对话!
连接配置示例:
- Graph ID: stock_agent
- Deployment URL: http://localhost:2024
- API Key: lsv2_xxx(可选)
本地开发
如果需要自定义界面,可以在本地运行:
方式 1:使用 npx 快速创建
bash
# 创建新项目
npx create-agent-chat-app --project-name my-chat-ui
cd my-chat-ui

# 安装依赖并启动
pnpm install
pnpm dev
方式 2:克隆仓库
bash
# 克隆完整项目
git clone https://github.com/langchain-ai/agent-chat-ui.git
cd agent-chat-ui

# 安装依赖并启动
pnpm install
pnpm dev
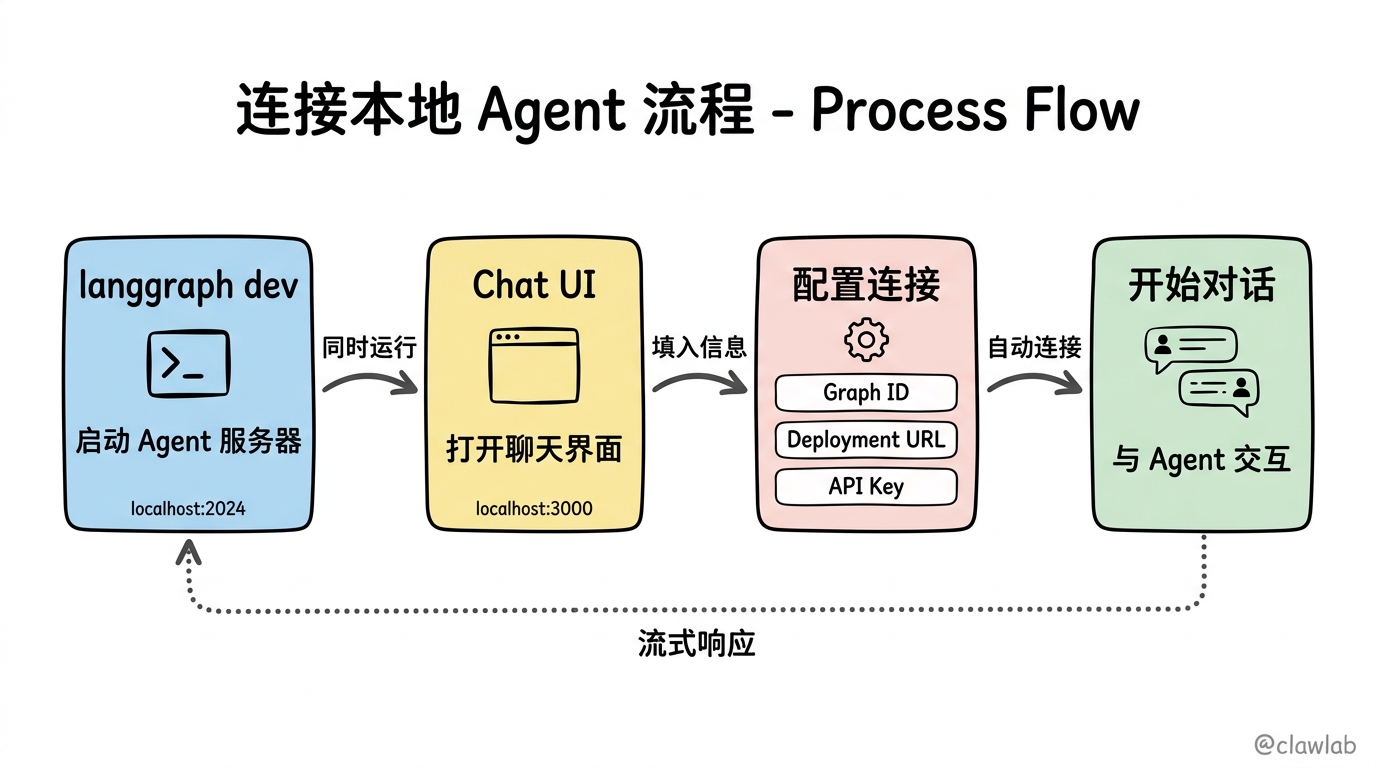
启动后访问 http://localhost:3000,配置连接信息即可使用。
核心功能
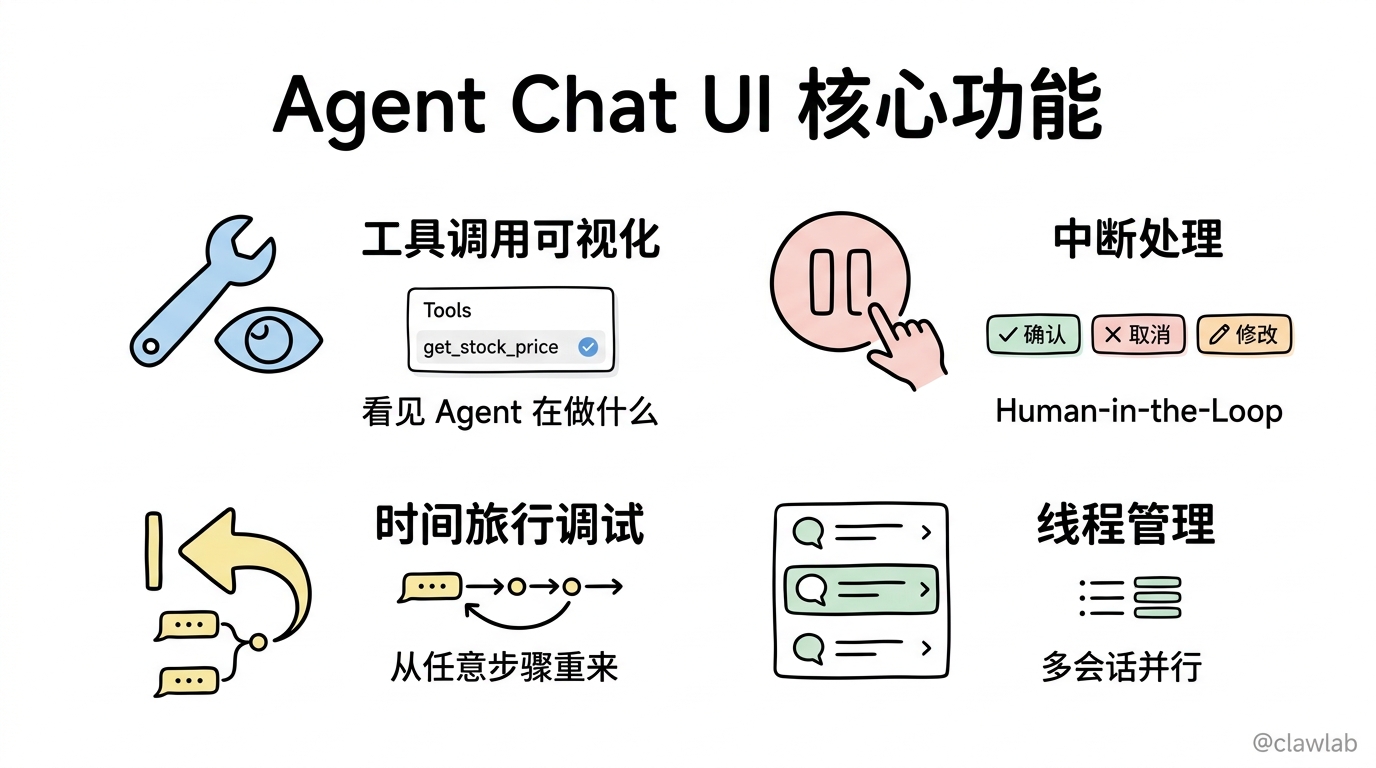
功能 1:工具调用可视化
Agent 调用工具时,界面会清晰展示:
┌─────────────────────────────────────────┐
│ 🤖 Assistant                            │
│                                         │
│ 让我帮你查询股票价格...                  │
│                                         │
│ ┌─────────────────────────────────────┐ │
│ │ 🔧 Tool Call: get_stock_price      │ │
│ │ Args: { symbol: "AAPL" }           │ │
│ │ Status: ✅ Completed                │ │
│ │ Result: $178.50                    │ │
│ └─────────────────────────────────────┘ │
│                                         │
│ 苹果公司(AAPL)当前股价是 $178.50。     │
└─────────────────────────────────────────┘
用户可以看到:
- 调用了什么工具
- 传入了什么参数
- 工具返回了什么结果
功能 2:中断处理(Human-in-the-Loop)
当 Agent 需要人工确认时,界面会暂停并等待用户决策:
┌─────────────────────────────────────────┐
│ 🤖 Assistant                            │
│                                         │
│ 我将要执行以下操作:                     │
│ - 卖出 100 股 AAPL                      │
│                                         │
│ ⚠️ 需要确认                             │
│ ┌─────────────────────────────────────┐ │
│ │ [✅ 确认执行]  [❌ 取消]  [✏️ 修改]  │ │
│ └─────────────────────────────────────┘ │
└─────────────────────────────────────────┘
功能 3:时间旅行调试
从任意对话步骤重新开始(fork):
对话历史:
├─ Step 1: 用户提问
├─ Step 2: Agent 调用工具 A
├─ Step 3: Agent 调用工具 B ← [从这里 Fork]
└─ Step 4: Agent 回复

点击 Fork 后,创建新分支从 Step 3 重新执行
这对于测试不同的对话路径非常有用。
功能 4:线程管理
管理多个对话会话:
┌─────────────────────────────────────────┐
│ 📋 对话列表                              │
├─────────────────────────────────────────┤
│ > 股票分析 - AAPL (进行中)              │
│   股票分析 - GOOGL (已完成)             │
│   投资建议咨询 (中断中)                  │
│   + 新建对话                            │
└─────────────────────────────────────────┘
连接本地 Agent
Step 1:启动 Agent 服务器
首先确保你的 Agent 服务器在运行:
bash
# 在你的 Agent 项目目录
langgraph dev
这会启动服务器在 http://localhost:2024。
Step 2:配置连接
在 Agent Chat UI 中配置:
| 字段 | 值 | 说明 |
|---|---|---|
| Graph ID | stock_agent | langgraph.json 中的 graphs 键名 |
| Deployment URL | http://localhost:2024 | Agent 服务器地址 |
| API Key | (留空) | 本地开发不需要 |
Step 3:验证连接
配置完成后,界面会自动获取:
- Agent 的可用工具列表
- 待处理的中断线程
- 历史对话记录
自定义界面
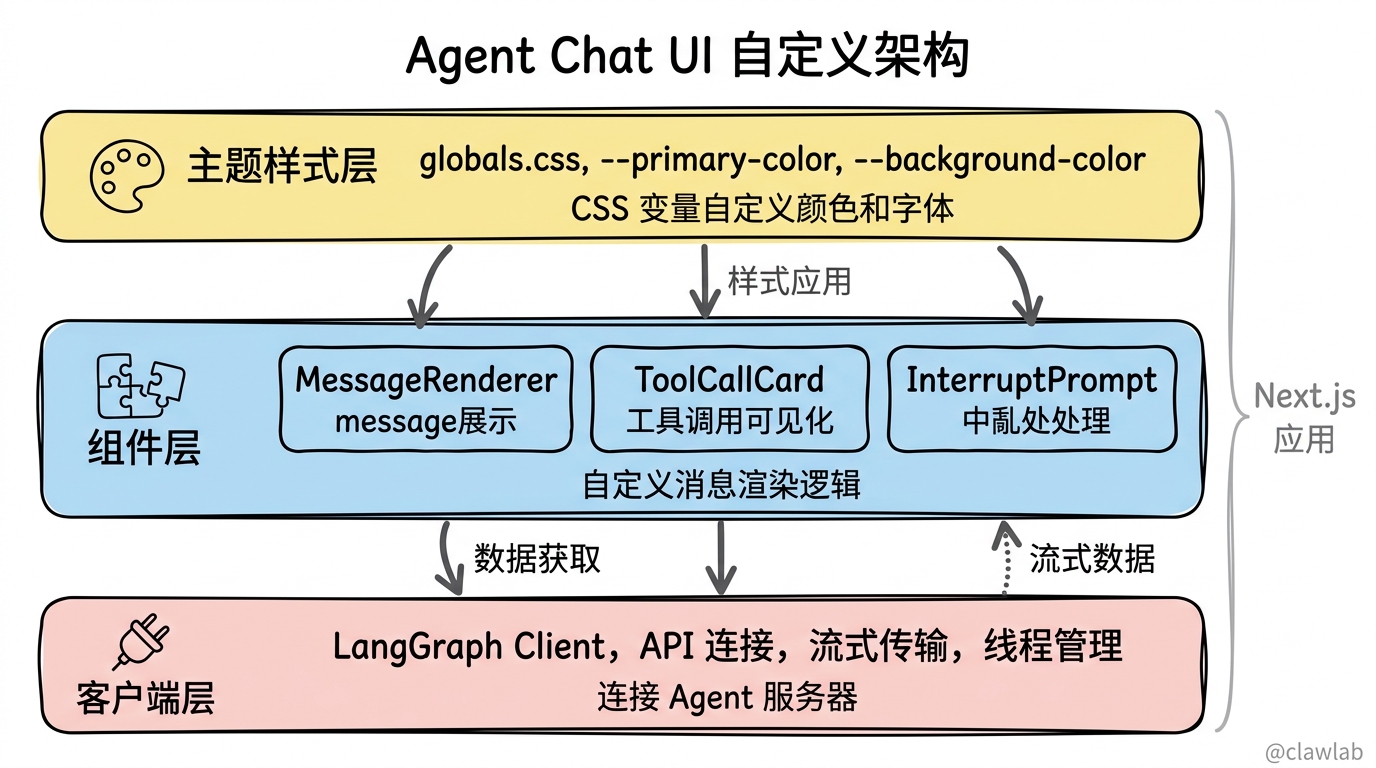
Agent Chat UI 是开源的 Next.js 项目,可以完全自定义:
修改主题样式
typescript
// app/globals.css
:root {
  --primary-color: #0066cc;
  --background-color: #f5f5f5;
  --message-user-bg: #e3f2fd;
  --message-assistant-bg: #ffffff;
}
自定义消息渲染
typescript
// components/MessageRenderer.tsx
function MessageRenderer({ message }) {
  // 自定义渲染逻辑
  if (message.type === 'tool_call') {
    return <ToolCallCard tool={message.tool} args={message.args} />;
  }

  if (message.type === 'interrupt') {
    return <InterruptPrompt options={message.options} />;
  }

  return <TextMessage content={message.content} />;
}
隐藏特定消息
有时候你不想显示某些内部消息:
typescript
// config.ts
export const hiddenMessageTypes = [
  'system',           // 隐藏系统消息
  'tool_result',      // 隐藏工具返回值(只显示最终结果)
];
完整示例:股票分析界面
Agent 代码
typescript
// src/agent.ts
import { createAgent, tool } from "langchain";
import * as z from "zod";

const getStockPrice = tool(
  async ({ symbol }) => {
    // 实际调用股票 API
    const prices = { AAPL: 178.50, GOOGL: 142.30, MSFT: 378.20 };
    return `${symbol}: $${prices[symbol] || "N/A"}`;
  },
  {
    name: "get_stock_price",
    description: "获取股票实时价格",
    schema: z.object({
      symbol: z.string().describe("股票代码,如 AAPL, GOOGL")
    })
  }
);

const analyzeStock = tool(
  async ({ symbol, period }) => {
    return `${symbol} 在过去 ${period} 天的分析:
- 趋势:上涨
- 建议:持有
- 风险等级:中`;
  },
  {
    name: "analyze_stock",
    description: "分析股票走势和投资建议",
    schema: z.object({
      symbol: z.string().describe("股票代码"),
      period: z.number().describe("分析周期(天)")
    })
  }
);

const executeOrder = tool(
  async ({ action, symbol, quantity }, config) => {
    // 需要人工确认的操作
    return {
      __interrupt__: {
        message: `即将${action === 'buy' ? '买入' : '卖出'} ${quantity} 股 ${symbol}`,
        options: ['confirm', 'cancel', 'modify']
      }
    };
  },
  {
    name: "execute_order",
    description: "执行股票交易(需要确认)",
    schema: z.object({
      action: z.enum(["buy", "sell"]).describe("交易类型"),
      symbol: z.string().describe("股票代码"),
      quantity: z.number().describe("数量")
    })
  }
);

export const agent = createAgent({
  model: "gpt-4.1",
  tools: [getStockPrice, analyzeStock, executeOrder],
  systemPrompt: `你是专业的股票分析助手。

能力:
1. 查询股票实时价格
2. 分析股票走势
3. 执行交易(需要用户确认)

回答风格:
- 专业但易懂
- 给出明确的建议
- 风险提示要清晰`
});
启动服务
bash
# 启动 Agent 服务器
langgraph dev

# 另一个终端,启动 Chat UI
cd agent-chat-ui
pnpm dev
使用界面
- 打开
http://localhost:3000 - 配置连接到
http://localhost:2024 - 开始对话:
用户:苹果公司现在的股价是多少?

🔧 Tool: get_stock_price
   Args: { symbol: "AAPL" }
   Result: AAPL: $178.50

助手:苹果公司(AAPL)当前股价是 $178.50。

用户:帮我分析一下最近30天的走势

🔧 Tool: analyze_stock
   Args: { symbol: "AAPL", period: 30 }
   Result: AAPL 在过去 30 天的分析...

助手:根据分析,AAPL 在过去30天呈上涨趋势,建议持有...

用户:买入100股

🔧 Tool: execute_order
   Args: { action: "buy", symbol: "AAPL", quantity: 100 }

⚠️ 需要确认
   即将买入 100 股 AAPL
   [确认执行] [取消] [修改]
部署到生产环境
部署 Agent
参考 LangGraph 部署文档,将 Agent 部署到云端。
部署 Chat UI
Agent Chat UI 是标准的 Next.js 应用,可以部署到:
bash
# Vercel(推荐)
vercel deploy

# 或其他平台
npm run build
npm run start
配置生产环境连接
typescript
// 环境变量
NEXT_PUBLIC_AGENT_URL=https://your-agent.langchain.com
NEXT_PUBLIC_LANGSMITH_API_KEY=lsv2_xxx
本章小结
Agent Chat UI 的核心价值:
快速搭建界面:
- 托管版本:5 分钟上手
- 本地开发:完全可定制
- 开源免费
核心功能:
- 工具调用可视化
- 中断处理(Human-in-the-Loop)
- 时间旅行调试
- 线程管理
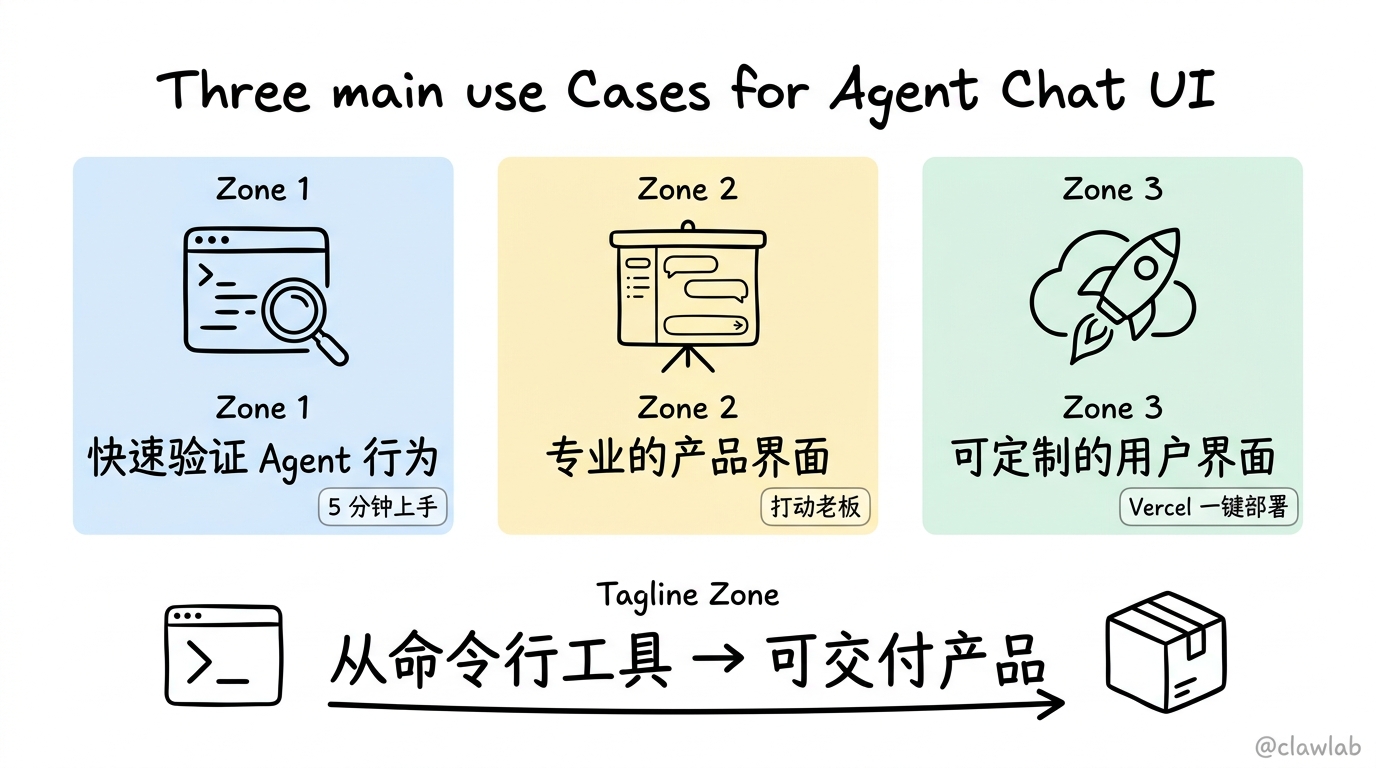
使用场景:
- 开发测试:快速验证 Agent 行为
- 演示展示:专业的产品界面
- 生产部署:可定制的用户界面
连接方式:
- 本地开发:连接 localhost:2024
- 部署环境:连接部署 URL
Agent Chat UI 让你的 Agent 从"命令行工具"变成"可交付产品"!
下一篇我们介绍 Agent 测试 —— 确保你的 Agent 质量稳定可靠。