主题
LangGraph 快速开始:构建你的第一个 Agent
简单来说
LangGraph 让你的 AI 学会"思考-行动-再思考"的循环。本篇文章手把手教你用两种风格(Graph API vs Functional API)搭建一个会做数学计算的 AI 助手,让你快速上手 LangGraph 的核心开发模式。
🎯 本节目标
学完本节,你将能够:
- 使用 Graph API 构建一个完整的工具调用 Agent
- 使用 Functional API 实现同样的功能
- 理解两种 API 风格的区别和适用场景
- 掌握 LangGraph 的核心开发模式
核心痛点与解决方案
痛点:传统 AI 调用的局限
场景还原: 假设你让 AI 帮你算 (3 + 4) * 5 / 2
| 问题 | 具体表现 |
|---|---|
| 单次调用的局限 | LLM 一次只能给你一个回答,复杂计算可能算错 |
| 无法使用工具 | 纯靠"脑算",不能调用计算器确保精确 |
| 流程控制混乱 | 想实现"先加后乘再除"的逻辑,代码写得像意大利面条 |
| 状态丢失 | 每次调用都是"失忆"的,不记得上一步算了什么 |
解决:LangGraph 的标准化流程
LangGraph 把这个循环过程标准化了:
用户提问 → [LLM思考] → 要用工具?
                            │
                     是     │     否
                     ↓      │      ↓
              [执行工具] ────┼───→ [返回答案]
                     │
                     ↓
              [把结果告诉LLM,继续思考]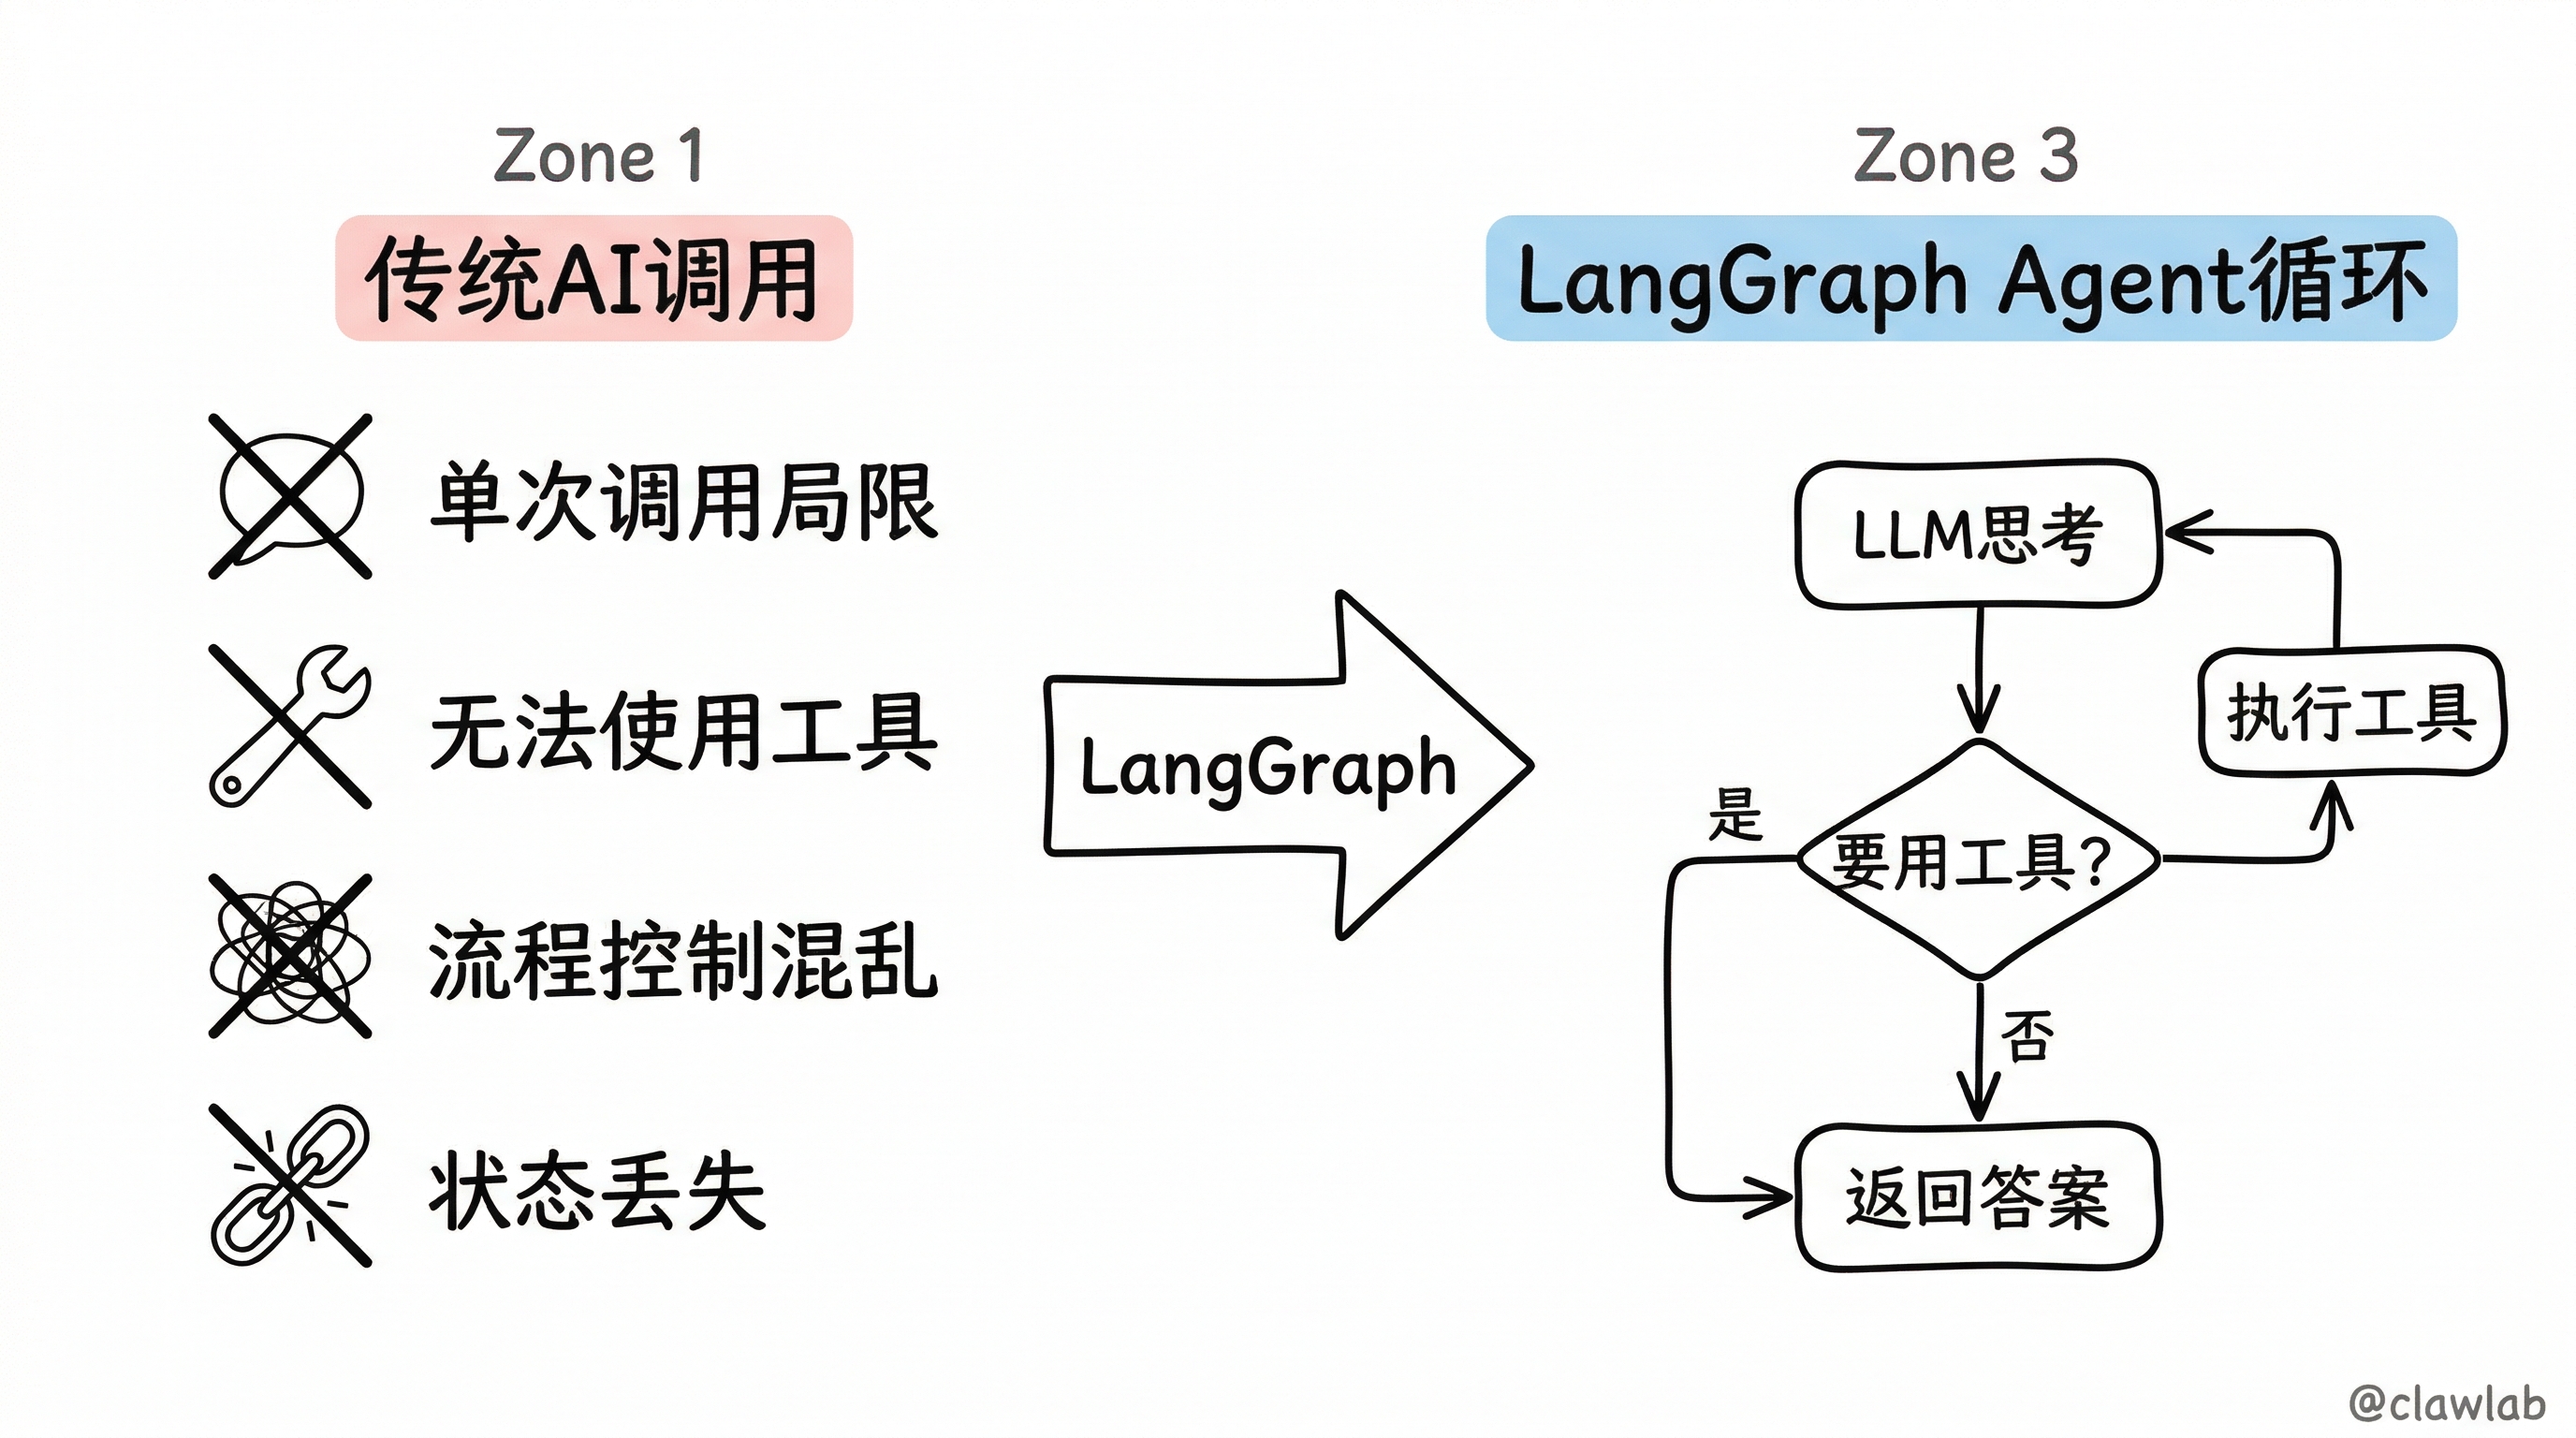
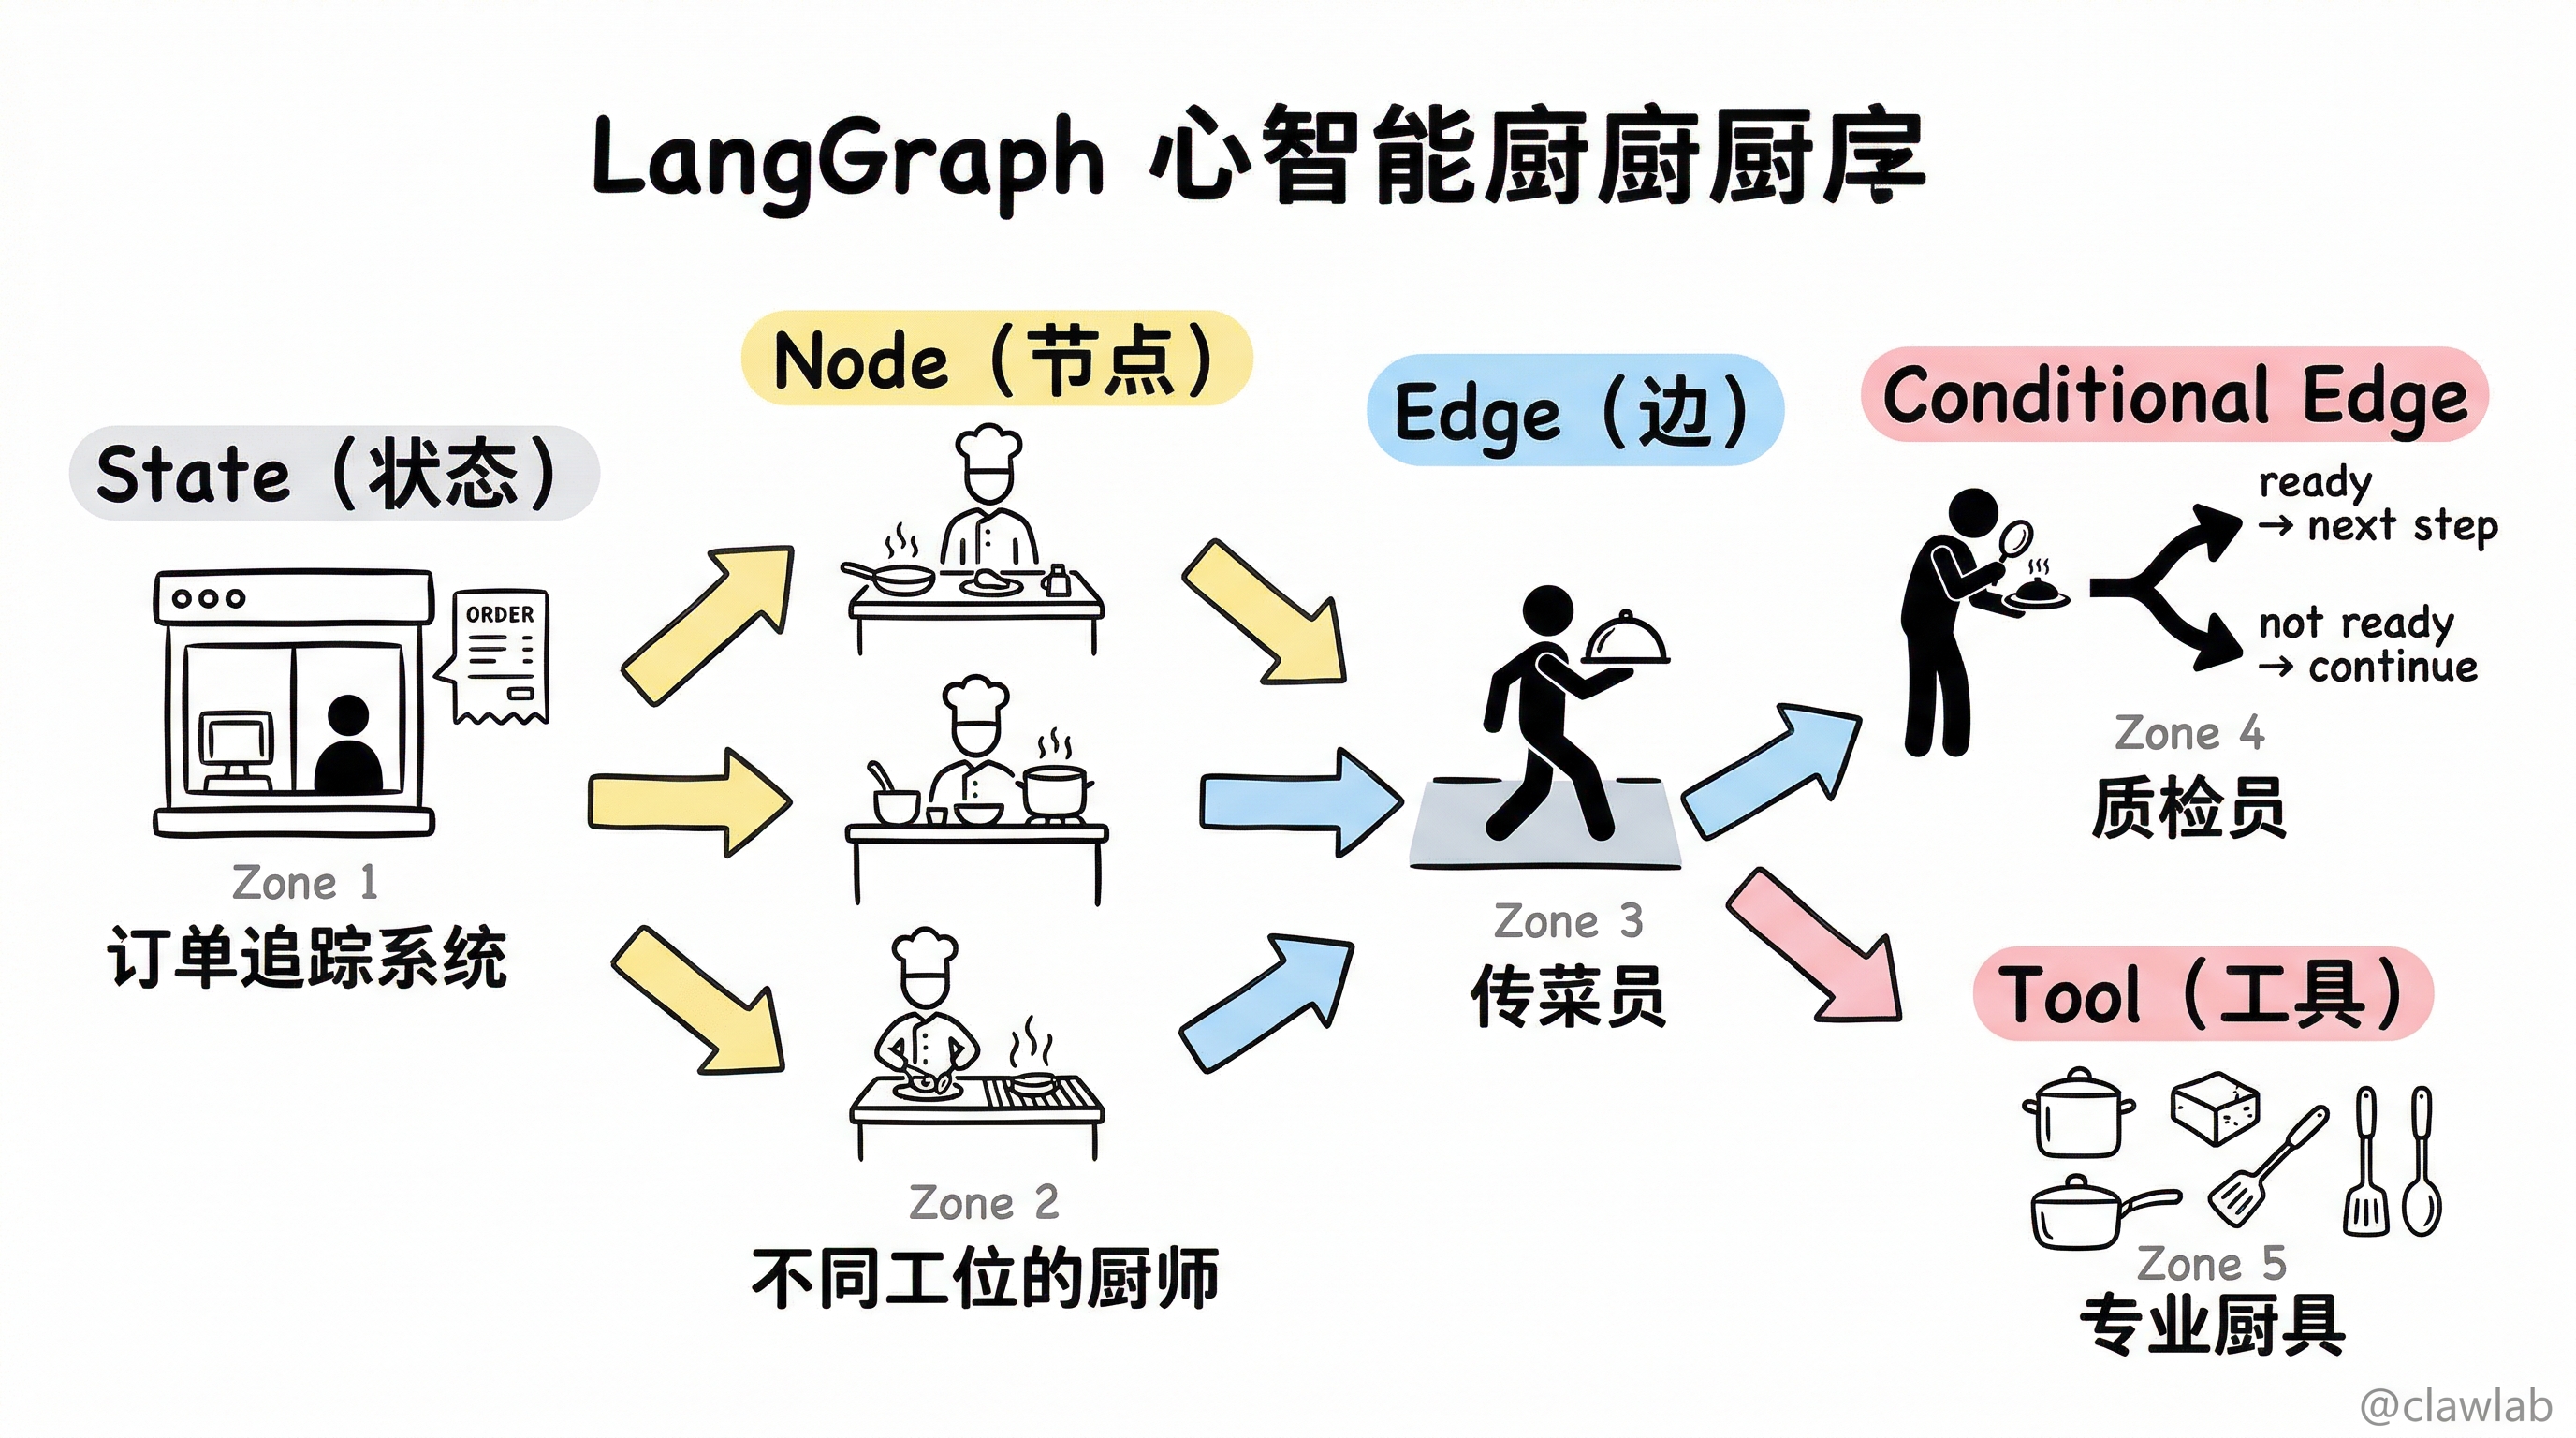
生活化类比:智能餐厅厨房
想象你走进一家高级餐厅,点了一道复杂的菜。
| LangGraph 概念 | 餐厅类比 | 职责 |
|---|---|---|
| State(状态) | 订单追踪系统 | 记录:这道菜现在到哪一步了? |
| Node(节点) | 不同工位的厨师 | 煎炸台、炖煮台、烧烤台...各司其职 |
| Edge(边) | 传菜员 | 把半成品从一个工位传到下一个 |
| Conditional Edge | 质检员 | 判断"好了吗?好了下一步;没好继续" |
| Tool(工具) | 专业厨具 | 计算器、搜索引擎...AI 的"锅碗瓢盆" |
方式一:使用 Graph API
Graph API 是"画流程图"的方式,适合复杂的多分支流程。
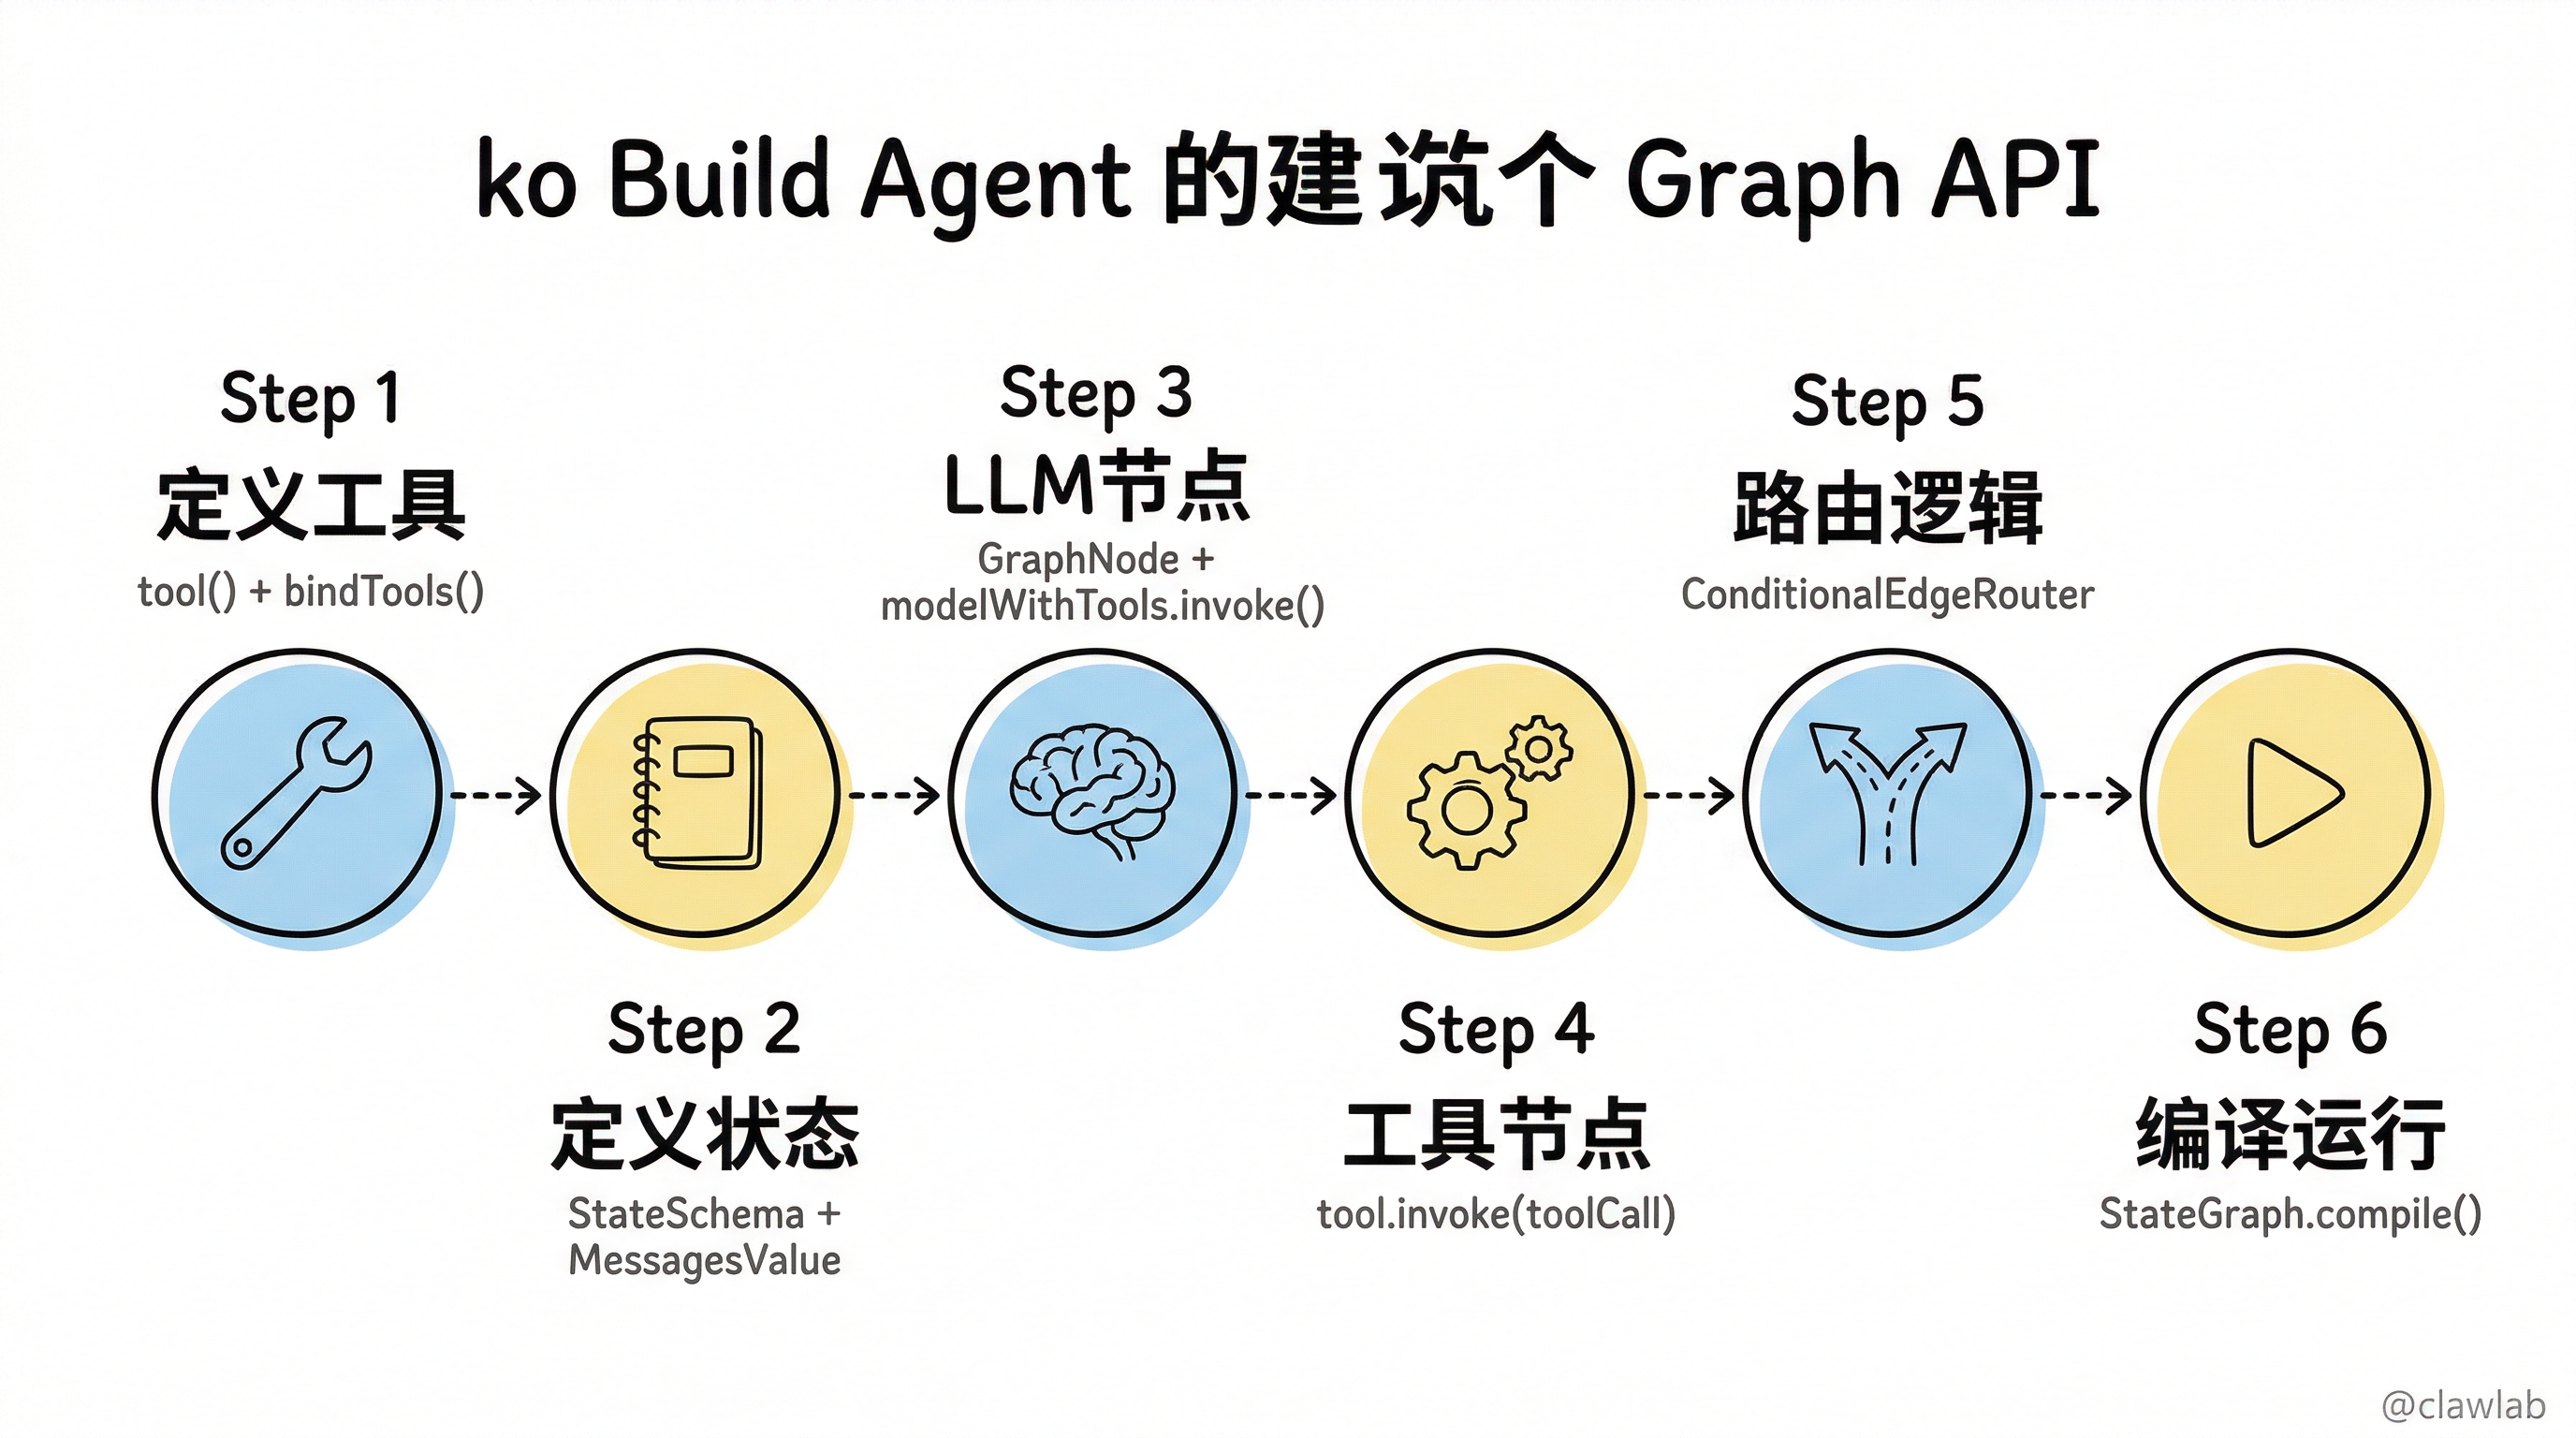
Step 1:定义工具和模型
typescript
import { ChatAnthropic } from "@langchain/anthropic";
import { tool } from "@langchain/core/tools";
import * as z from "zod";

const model = new ChatAnthropic({
  model: "claude-sonnet-4-5-20250929",
  temperature: 0,
});

const add = tool(({ a, b }) => a + b, {
  name: "add",
  description: "Add two numbers",
  schema: z.object({
    a: z.number().describe("First number"),
    b: z.number().describe("Second number"),
  }),
});

const multiply = tool(({ a, b }) => a * b, {
  name: "multiply",
  description: "Multiply two numbers",
  schema: z.object({
    a: z.number().describe("First number"),
    b: z.number().describe("Second number"),
  }),
});

const divide = tool(({ a, b }) => a / b, {
  name: "divide",
  description: "Divide two numbers",
  schema: z.object({
    a: z.number().describe("First number"),
    b: z.number().describe("Second number"),
  }),
});

const toolsByName = {
  [add.name]: add,
  [multiply.name]: multiply,
  [divide.name]: divide,
};
const tools = Object.values(toolsByName);
const modelWithTools = model.bindTools(tools);
💡 人话解读:
tool()函数:给 AI 创建一个"工具",告诉它这个工具叫什么、干什么用、需要什么参数model.bindTools(tools):把工具"绑定"到模型上,让 AI 知道它可以使用这些工具description和schema:这是给 AI 看的"使用说明书"
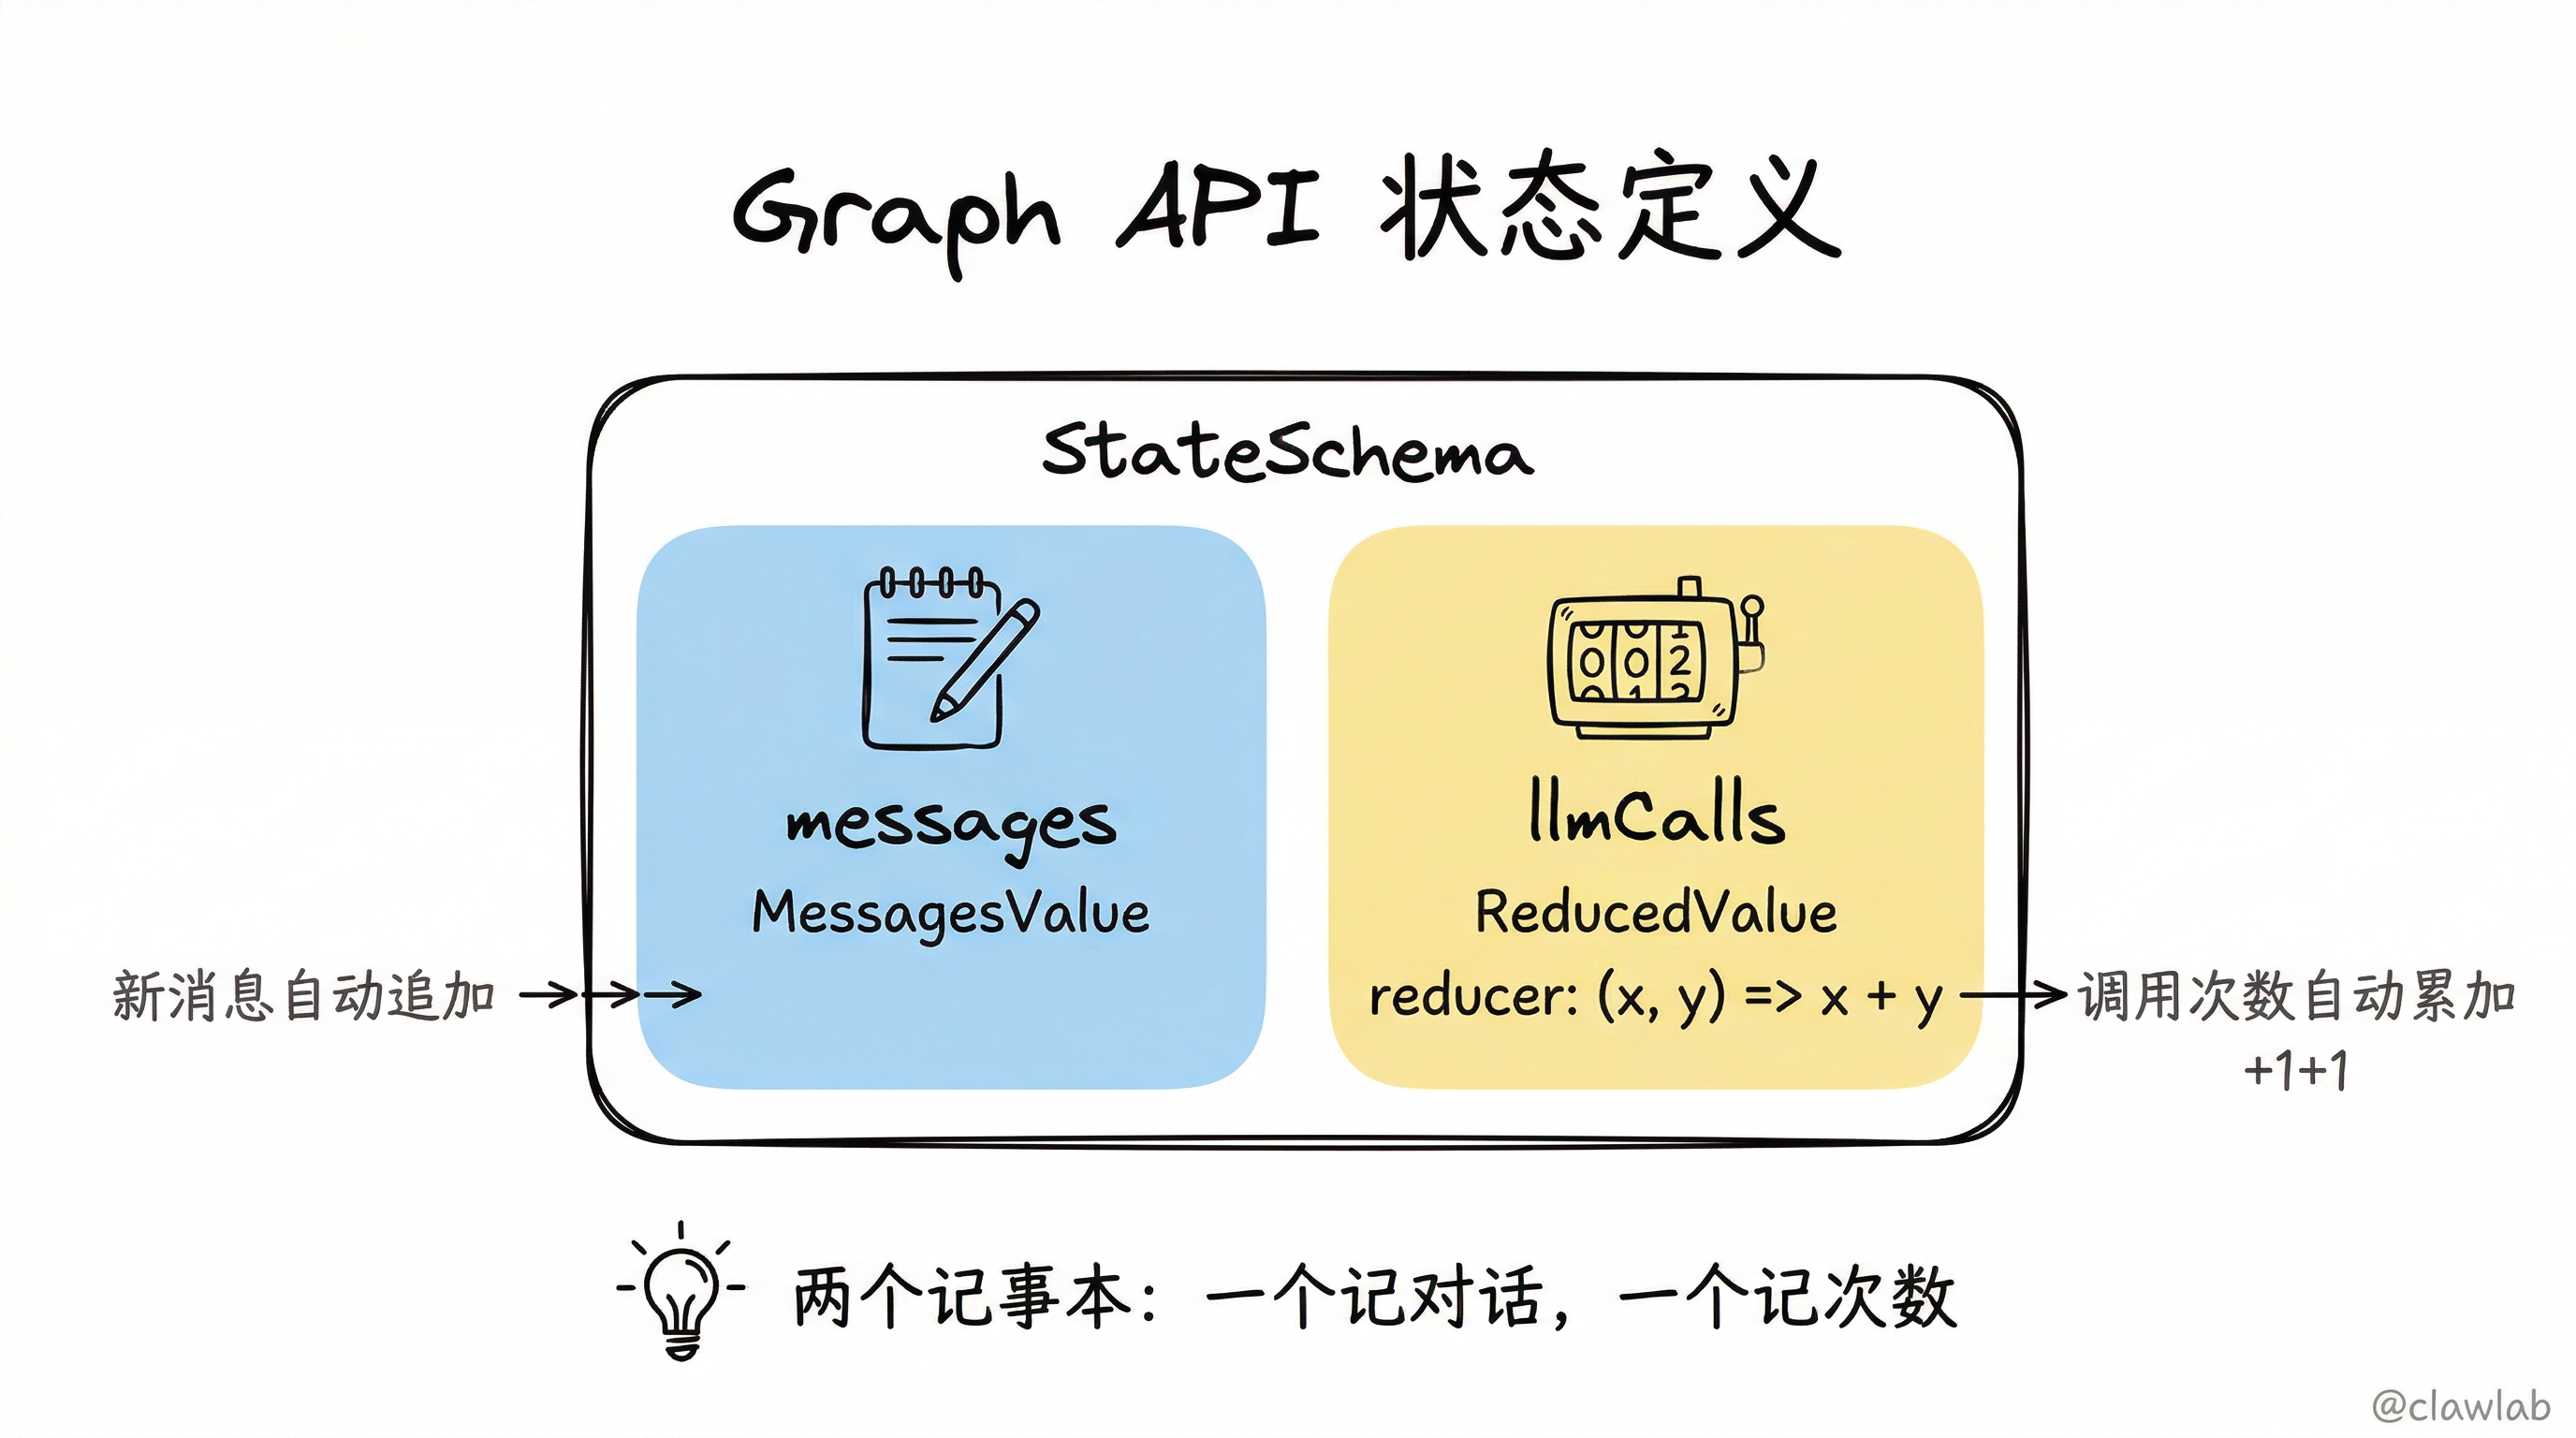
Step 2:定义状态
typescript
import {
  StateGraph,
  StateSchema,
  MessagesValue,
  ReducedValue,
  GraphNode,
  ConditionalEdgeRouter,
  START,
  END,
} from "@langchain/langgraph";
import { z } from "zod/v4";

const MessagesState = new StateSchema({
  messages: MessagesValue,
  llmCalls: new ReducedValue(
    z.number().default(0),
    { reducer: (x, y) => x + y }
  ),
});
💡 人话解读:
MessagesValue:内置的消息列表类型,新消息会自动追加到历史记录ReducedValue:带 reducer 的值,这里用于累加 LLM 调用次数- 整体意思:AI 有两个记事本——一个记对话内容(自动追加),一个记被调用几次(自动累加)
Step 3:定义 LLM 节点
typescript
import { SystemMessage } from "@langchain/core/messages";

const llmCall: GraphNode<typeof MessagesState> = async (state) => {
  const response = await modelWithTools.invoke([
    new SystemMessage(
      "You are a helpful assistant tasked with performing arithmetic on a set of inputs."
    ),
    ...state.messages,
  ]);
  return {
    messages: [response],
    llmCalls: 1,
  };
};
💡 人话解读: 这个节点的工作是:拿着当前对话历史去问 LLM,把 LLM 的回复加到消息列表,并记录调用了一次。
Step 4:定义工具节点
typescript
import { AIMessage, ToolMessage } from "@langchain/core/messages";

const toolNode: GraphNode<typeof MessagesState> = async (state) => {
  const lastMessage = state.messages.at(-1);

  if (lastMessage == null || !AIMessage.isInstance(lastMessage)) {
    return { messages: [] };
  }

  const result: ToolMessage[] = [];
  for (const toolCall of lastMessage.tool_calls ?? []) {
    const tool = toolsByName[toolCall.name];
    const observation = await tool.invoke(toolCall);
    result.push(observation);
  }

  return { messages: result };
};
💡 人话解读: 这个节点的工作是:看看 LLM 要调用什么工具,执行工具,把结果返回。
Step 5:定义路由逻辑
typescript
const shouldContinue: ConditionalEdgeRouter<typeof MessagesState, "toolNode"> = (state) => {
  const lastMessage = state.messages.at(-1);

  if (!lastMessage || !AIMessage.isInstance(lastMessage)) {
    return END;
  }

  if (lastMessage.tool_calls?.length) {
    return "toolNode";
  }

  return END;
};
💡 人话解读: 这是一个"十字路口"——如果 LLM 说要用工具,就去工具节点;否则直接结束。
Step 6:构建并运行 Agent
typescript
import { HumanMessage } from "@langchain/core/messages";

const agent = new StateGraph(MessagesState)
  .addNode("llmCall", llmCall)
  .addNode("toolNode", toolNode)
  .addEdge(START, "llmCall")
  .addConditionalEdges("llmCall", shouldContinue, ["toolNode", END])
  .addEdge("toolNode", "llmCall")
  .compile();

const result = await agent.invoke({
  messages: [new HumanMessage("Add 3 and 4.")],
});

for (const message of result.messages) {
  console.log(`[${message.type}]: ${message.text}`);
}
流程图可视化
     START
        │
        ↓
   ┌──────────┐
   │ llmCall  │◄─────────┐
   └────┬─────┘          │
        │                │
        ↓                │
  [shouldContinue?]      │
   /          \          │
  ↓            ↓         │
toolNode      END        │
  │                      │
  └──────────────────────┘
方式二:使用 Functional API
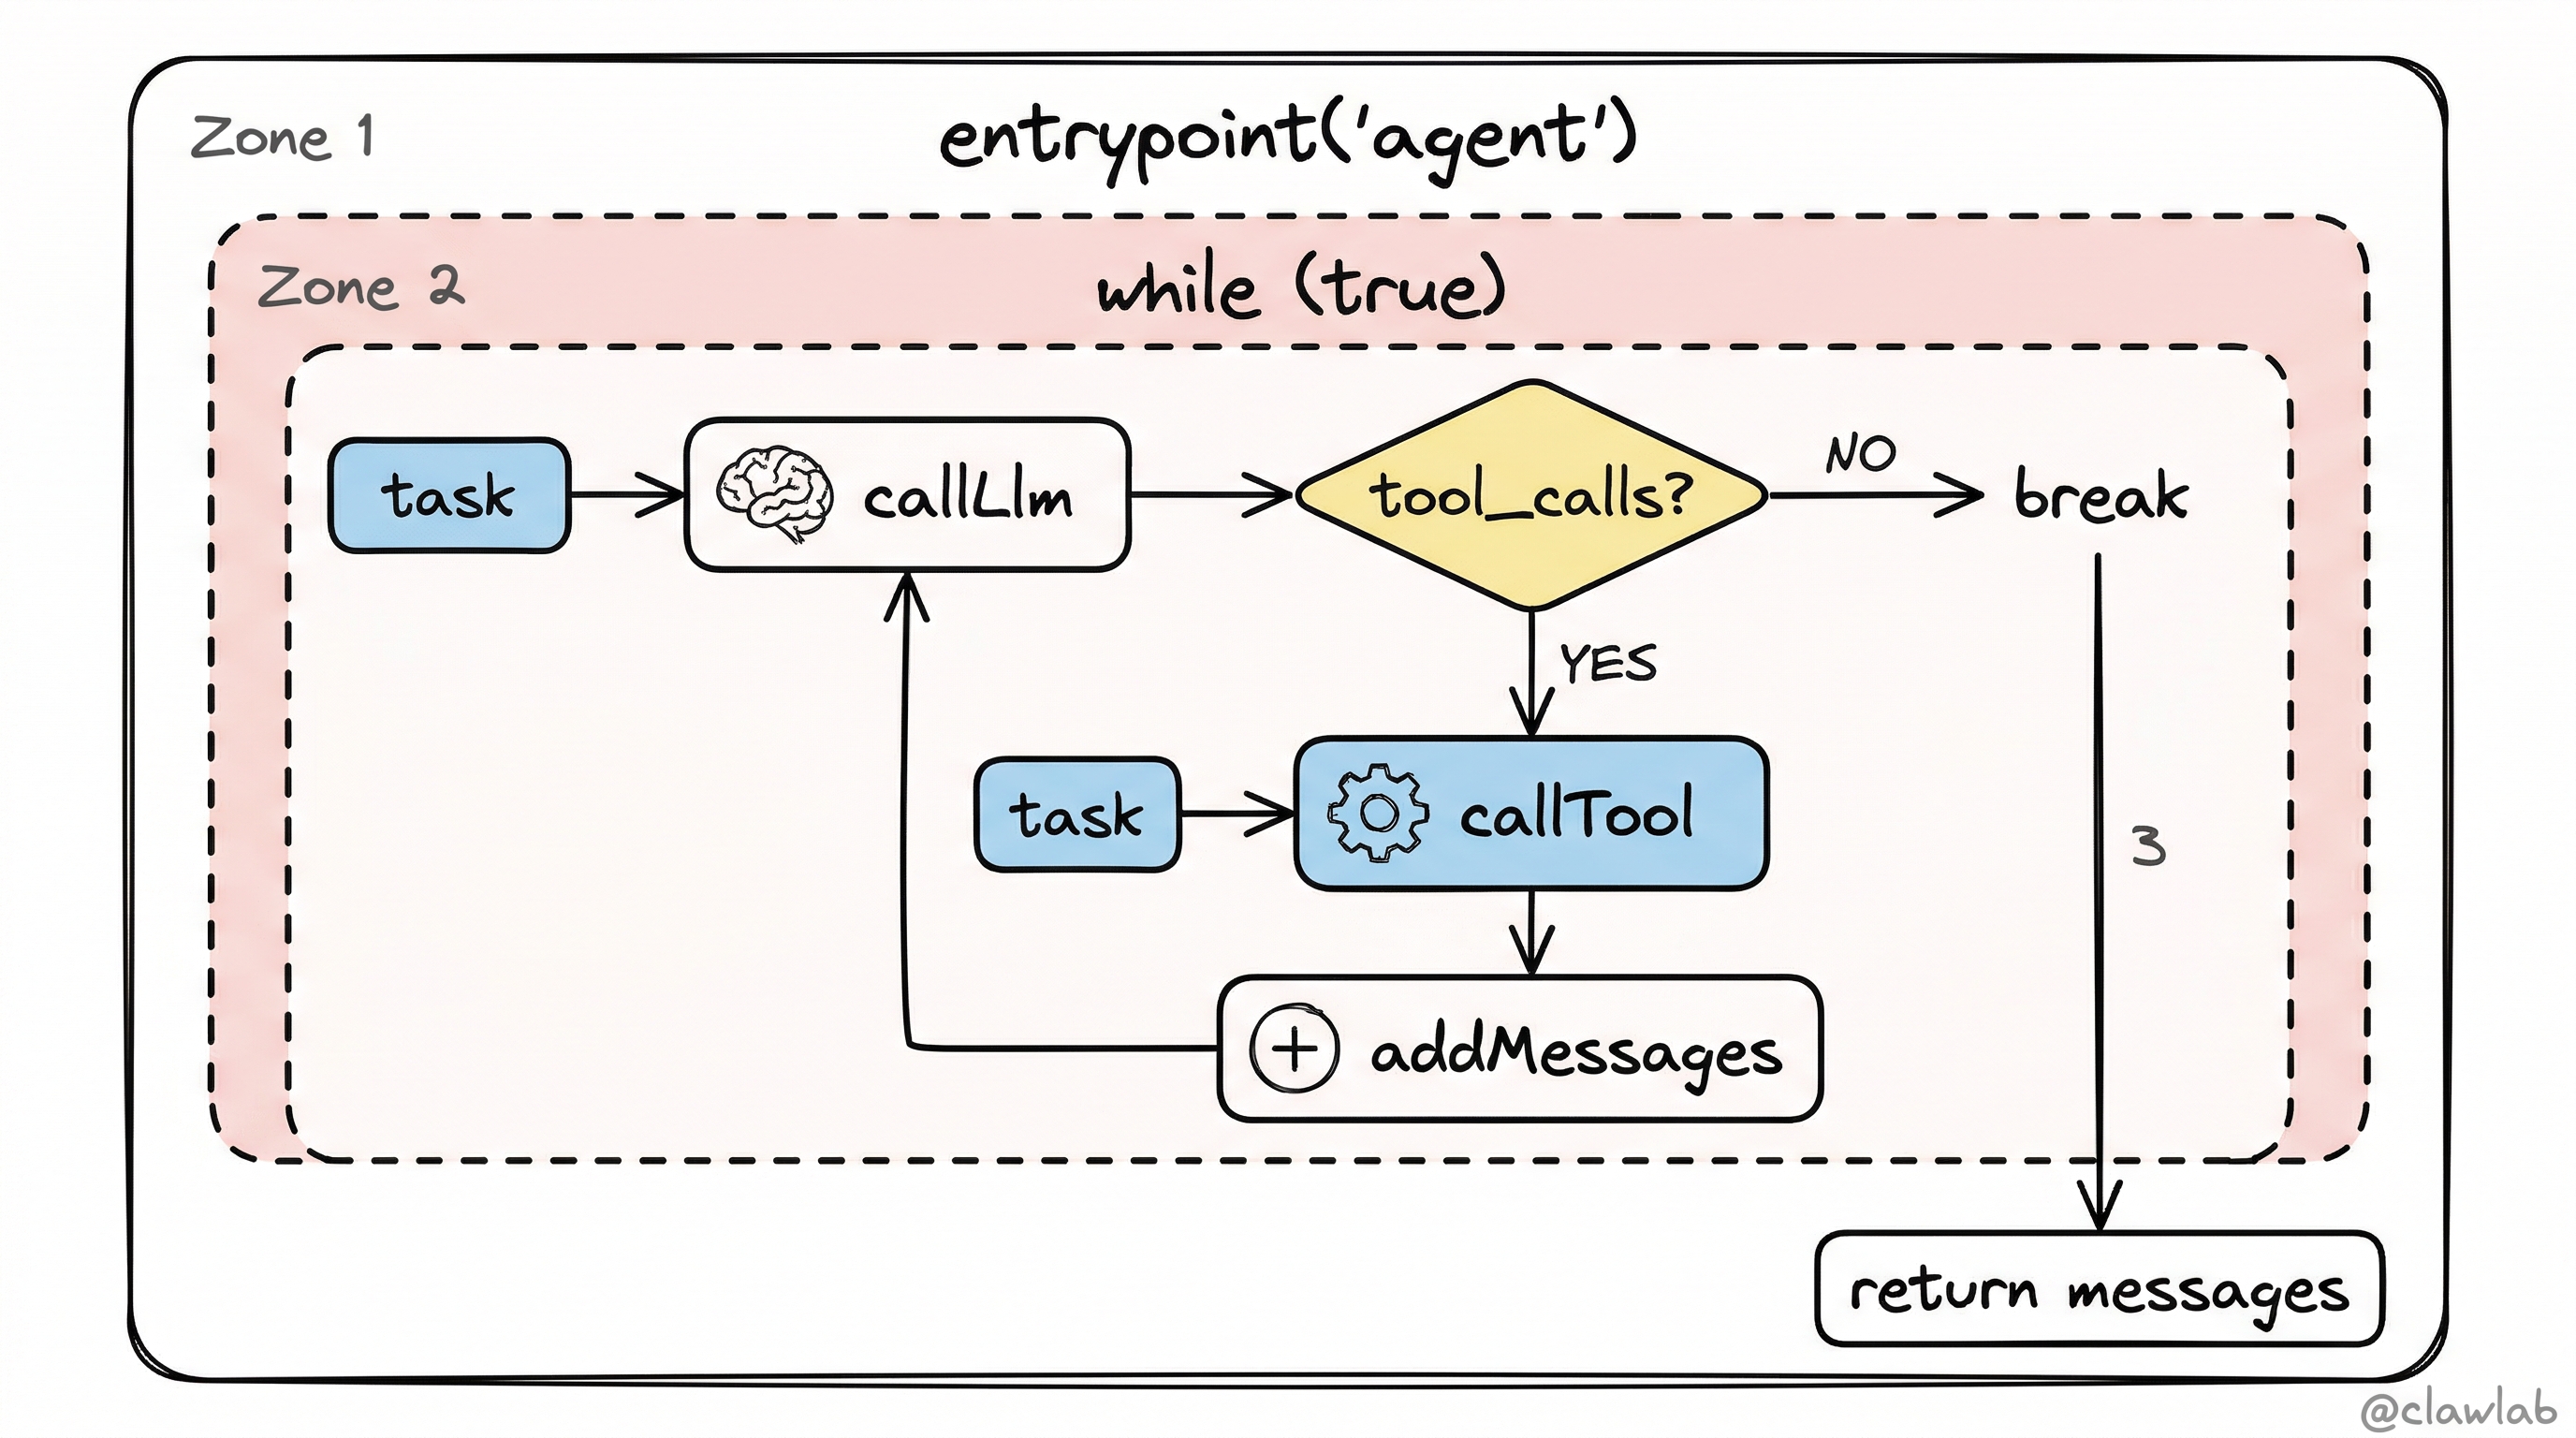
Functional API 是"写函数"的方式,用传统的 while 循环实现同样的功能。
完整代码
typescript
import { ChatAnthropic } from "@langchain/anthropic";
import { tool } from "@langchain/core/tools";
import { task, entrypoint, addMessages } from "@langchain/langgraph";
import { SystemMessage, HumanMessage, type BaseMessage } from "@langchain/core/messages";
import type { ToolCall } from "@langchain/core/messages/tool";
import * as z from "zod";

const model = new ChatAnthropic({
  model: "claude-sonnet-4-5-20250929",
  temperature: 0,
});

const add = tool(({ a, b }) => a + b, {
  name: "add",
  description: "Add two numbers",
  schema: z.object({
    a: z.number().describe("First number"),
    b: z.number().describe("Second number"),
  }),
});

const multiply = tool(({ a, b }) => a * b, {
  name: "multiply",
  description: "Multiply two numbers",
  schema: z.object({
    a: z.number().describe("First number"),
    b: z.number().describe("Second number"),
  }),
});

const divide = tool(({ a, b }) => a / b, {
  name: "divide",
  description: "Divide two numbers",
  schema: z.object({
    a: z.number().describe("First number"),
    b: z.number().describe("Second number"),
  }),
});

const toolsByName = {
  [add.name]: add,
  [multiply.name]: multiply,
  [divide.name]: divide,
};
const tools = Object.values(toolsByName);
const modelWithTools = model.bindTools(tools);

const callLlm = task({ name: "callLlm" }, async (messages: BaseMessage[]) => {
  return modelWithTools.invoke([
    new SystemMessage(
      "You are a helpful assistant tasked with performing arithmetic on a set of inputs."
    ),
    ...messages,
  ]);
});

const callTool = task({ name: "callTool" }, async (toolCall: ToolCall) => {
  const tool = toolsByName[toolCall.name];
  return tool.invoke(toolCall);
});

const agent = entrypoint({ name: "agent" }, async (messages: BaseMessage[]) => {
  let modelResponse = await callLlm(messages);

  while (true) {
    if (!modelResponse.tool_calls?.length) {
      break;
    }

    const toolResults = await Promise.all(
      modelResponse.tool_calls.map((toolCall) => callTool(toolCall))
    );
    messages = addMessages(messages, [modelResponse, ...toolResults]);
    modelResponse = await callLlm(messages);
  }

  return messages;
});

const result = await agent.invoke([new HumanMessage("Add 3 and 4.")]);

for (const message of result) {
  console.log(`[${message.getType()}]: ${message.text}`);
}
💡 人话解读:
task():定义一个可复用的任务单元entrypoint():定义整个 Agent 的入口函数while (true):无限循环,直到 LLM 不再需要调用工具addMessages():把新消息追加到历史记录
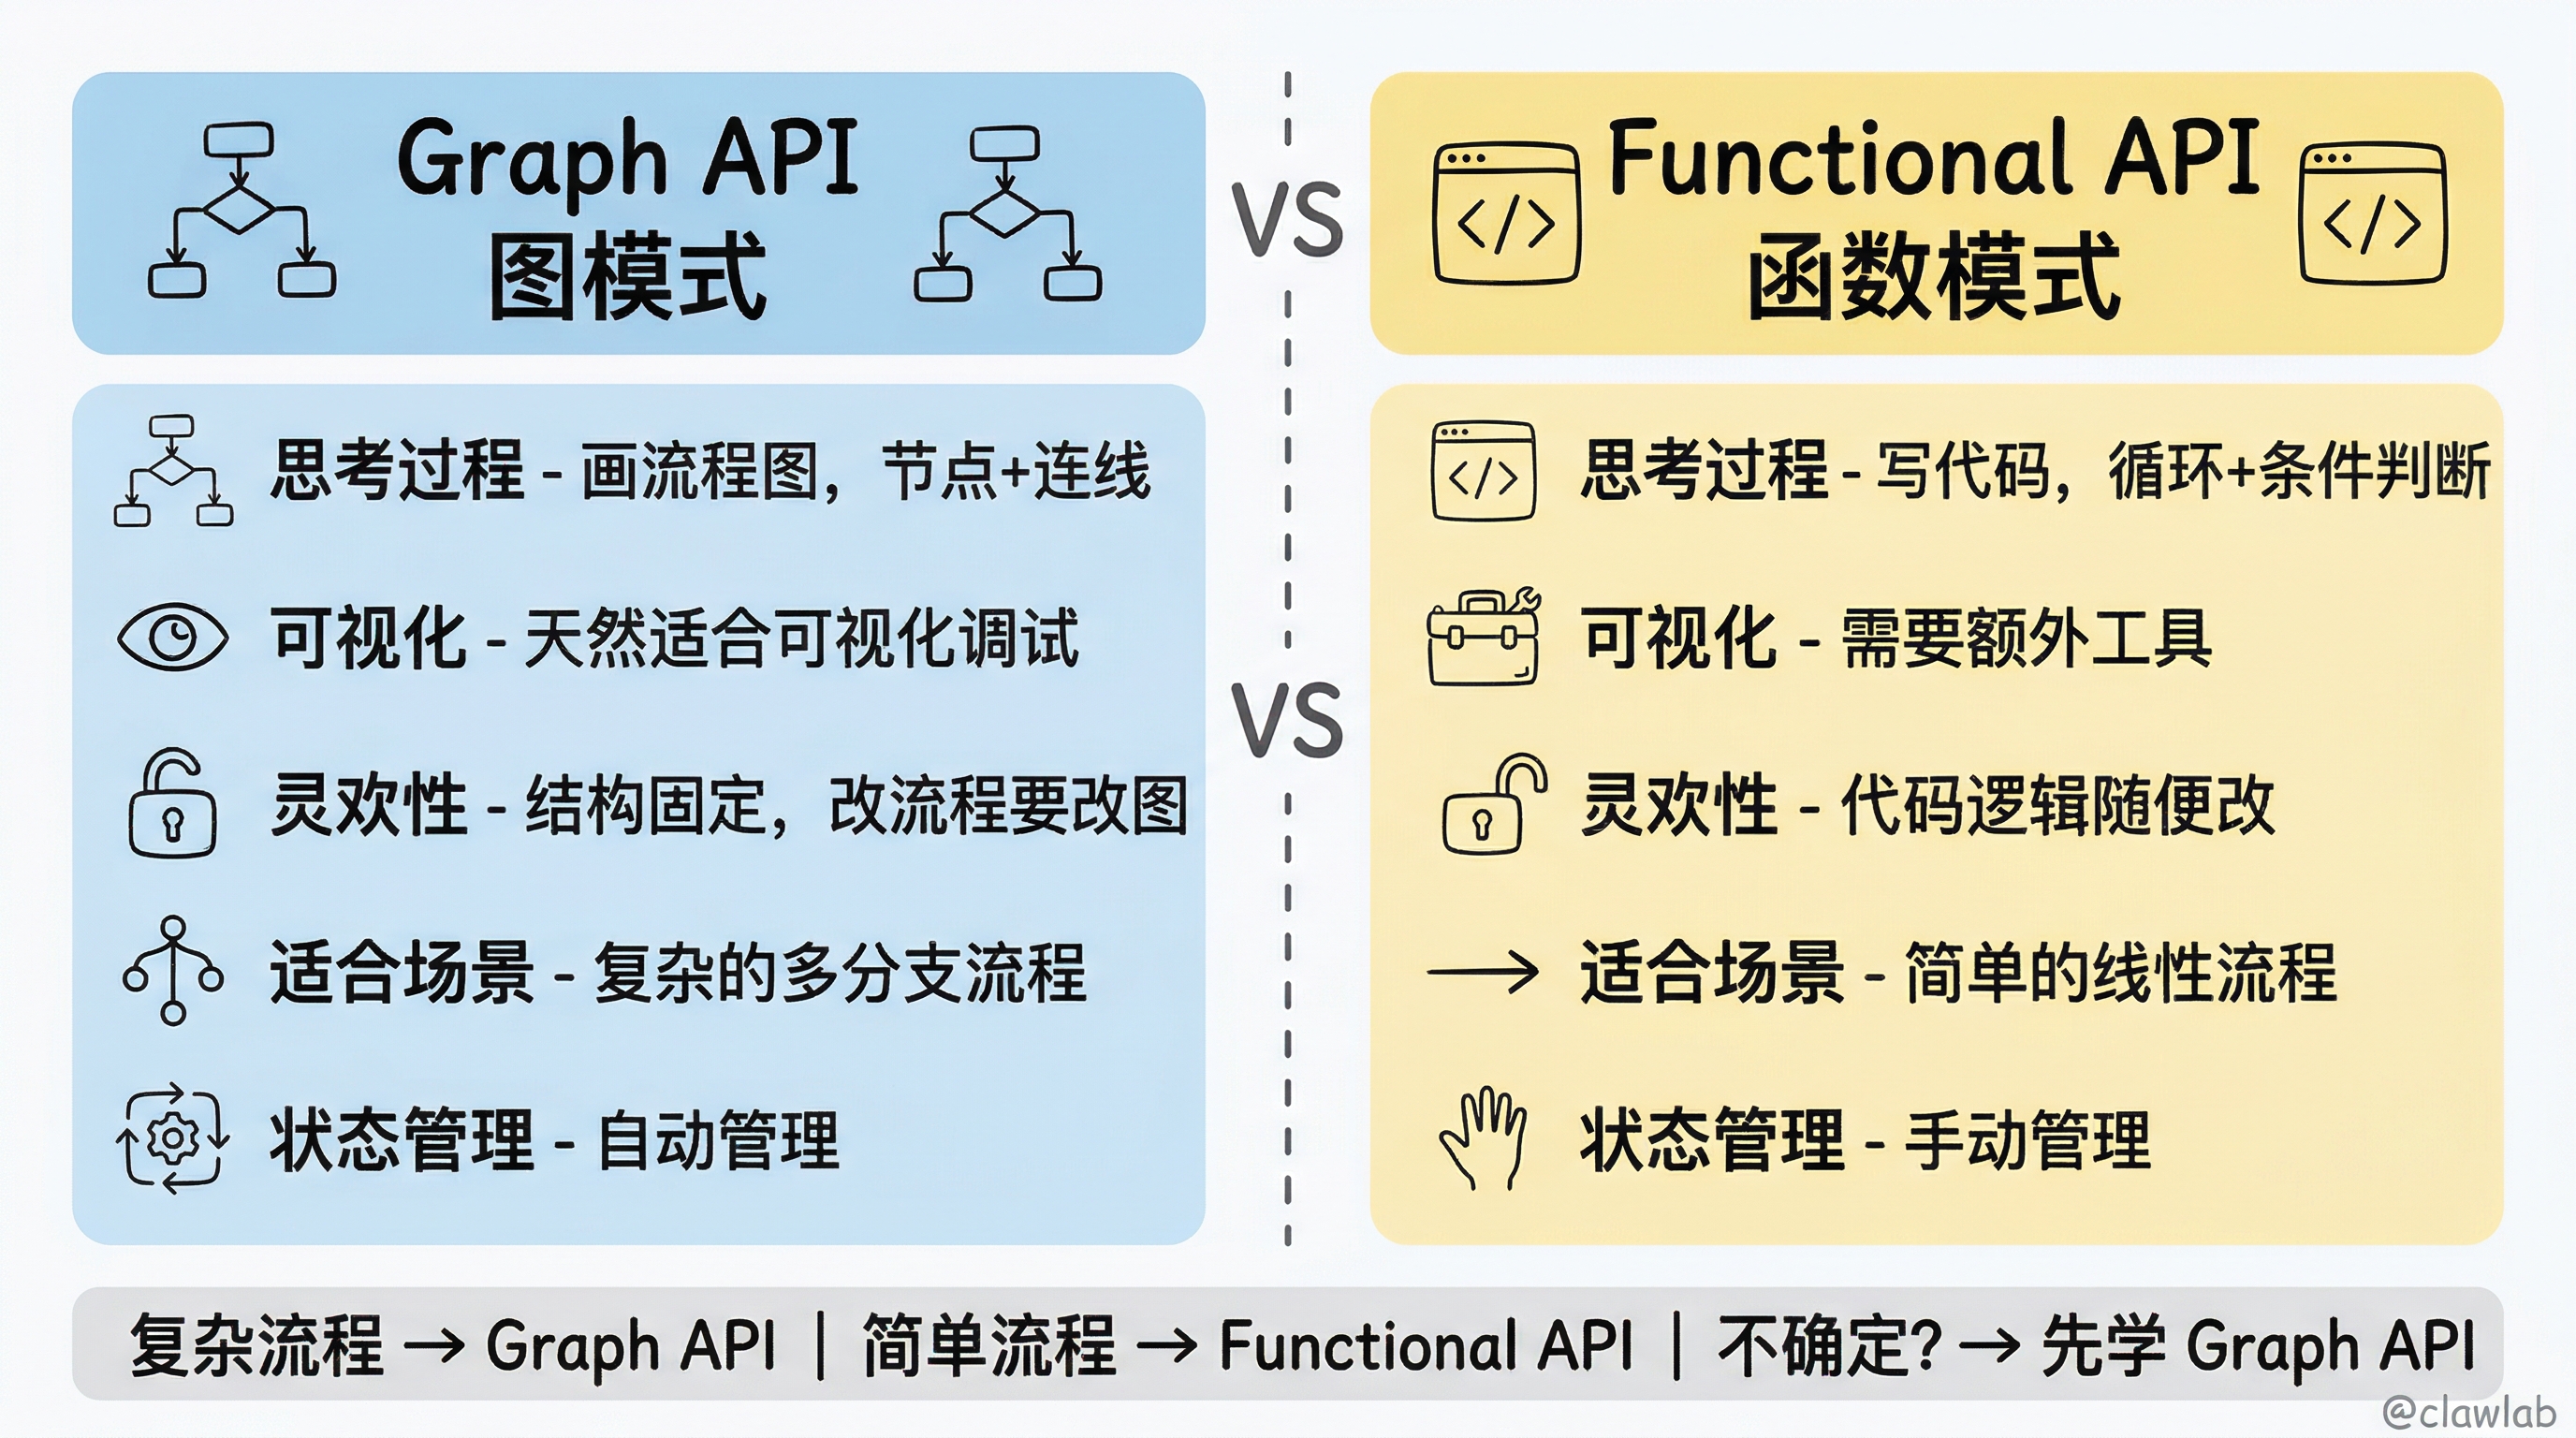
两种 API 风格对比
| 维度 | Graph API (图模式) | Functional API (函数模式) |
|---|---|---|
| 思维方式 | 画流程图,节点+连线 | 写代码,循环+条件判断 |
| 可视化 | 天然适合可视化调试 | 需要额外工具 |
| 灵活性 | 结构固定,改流程要改图 | 代码逻辑随便改 |
| 适合场景 | 复杂的多分支流程 | 简单的线性流程 |
| 学习曲线 | 需要理解图的概念 | 更接近传统编程 |
| 状态管理 | 自动管理 | 手动管理 |
选择建议
- 流程复杂、需要可视化调试 → Graph API
- 流程简单、喜欢传统写法 → Functional API
- 不确定?→ 先学 Graph API,这是 LangGraph 的核心
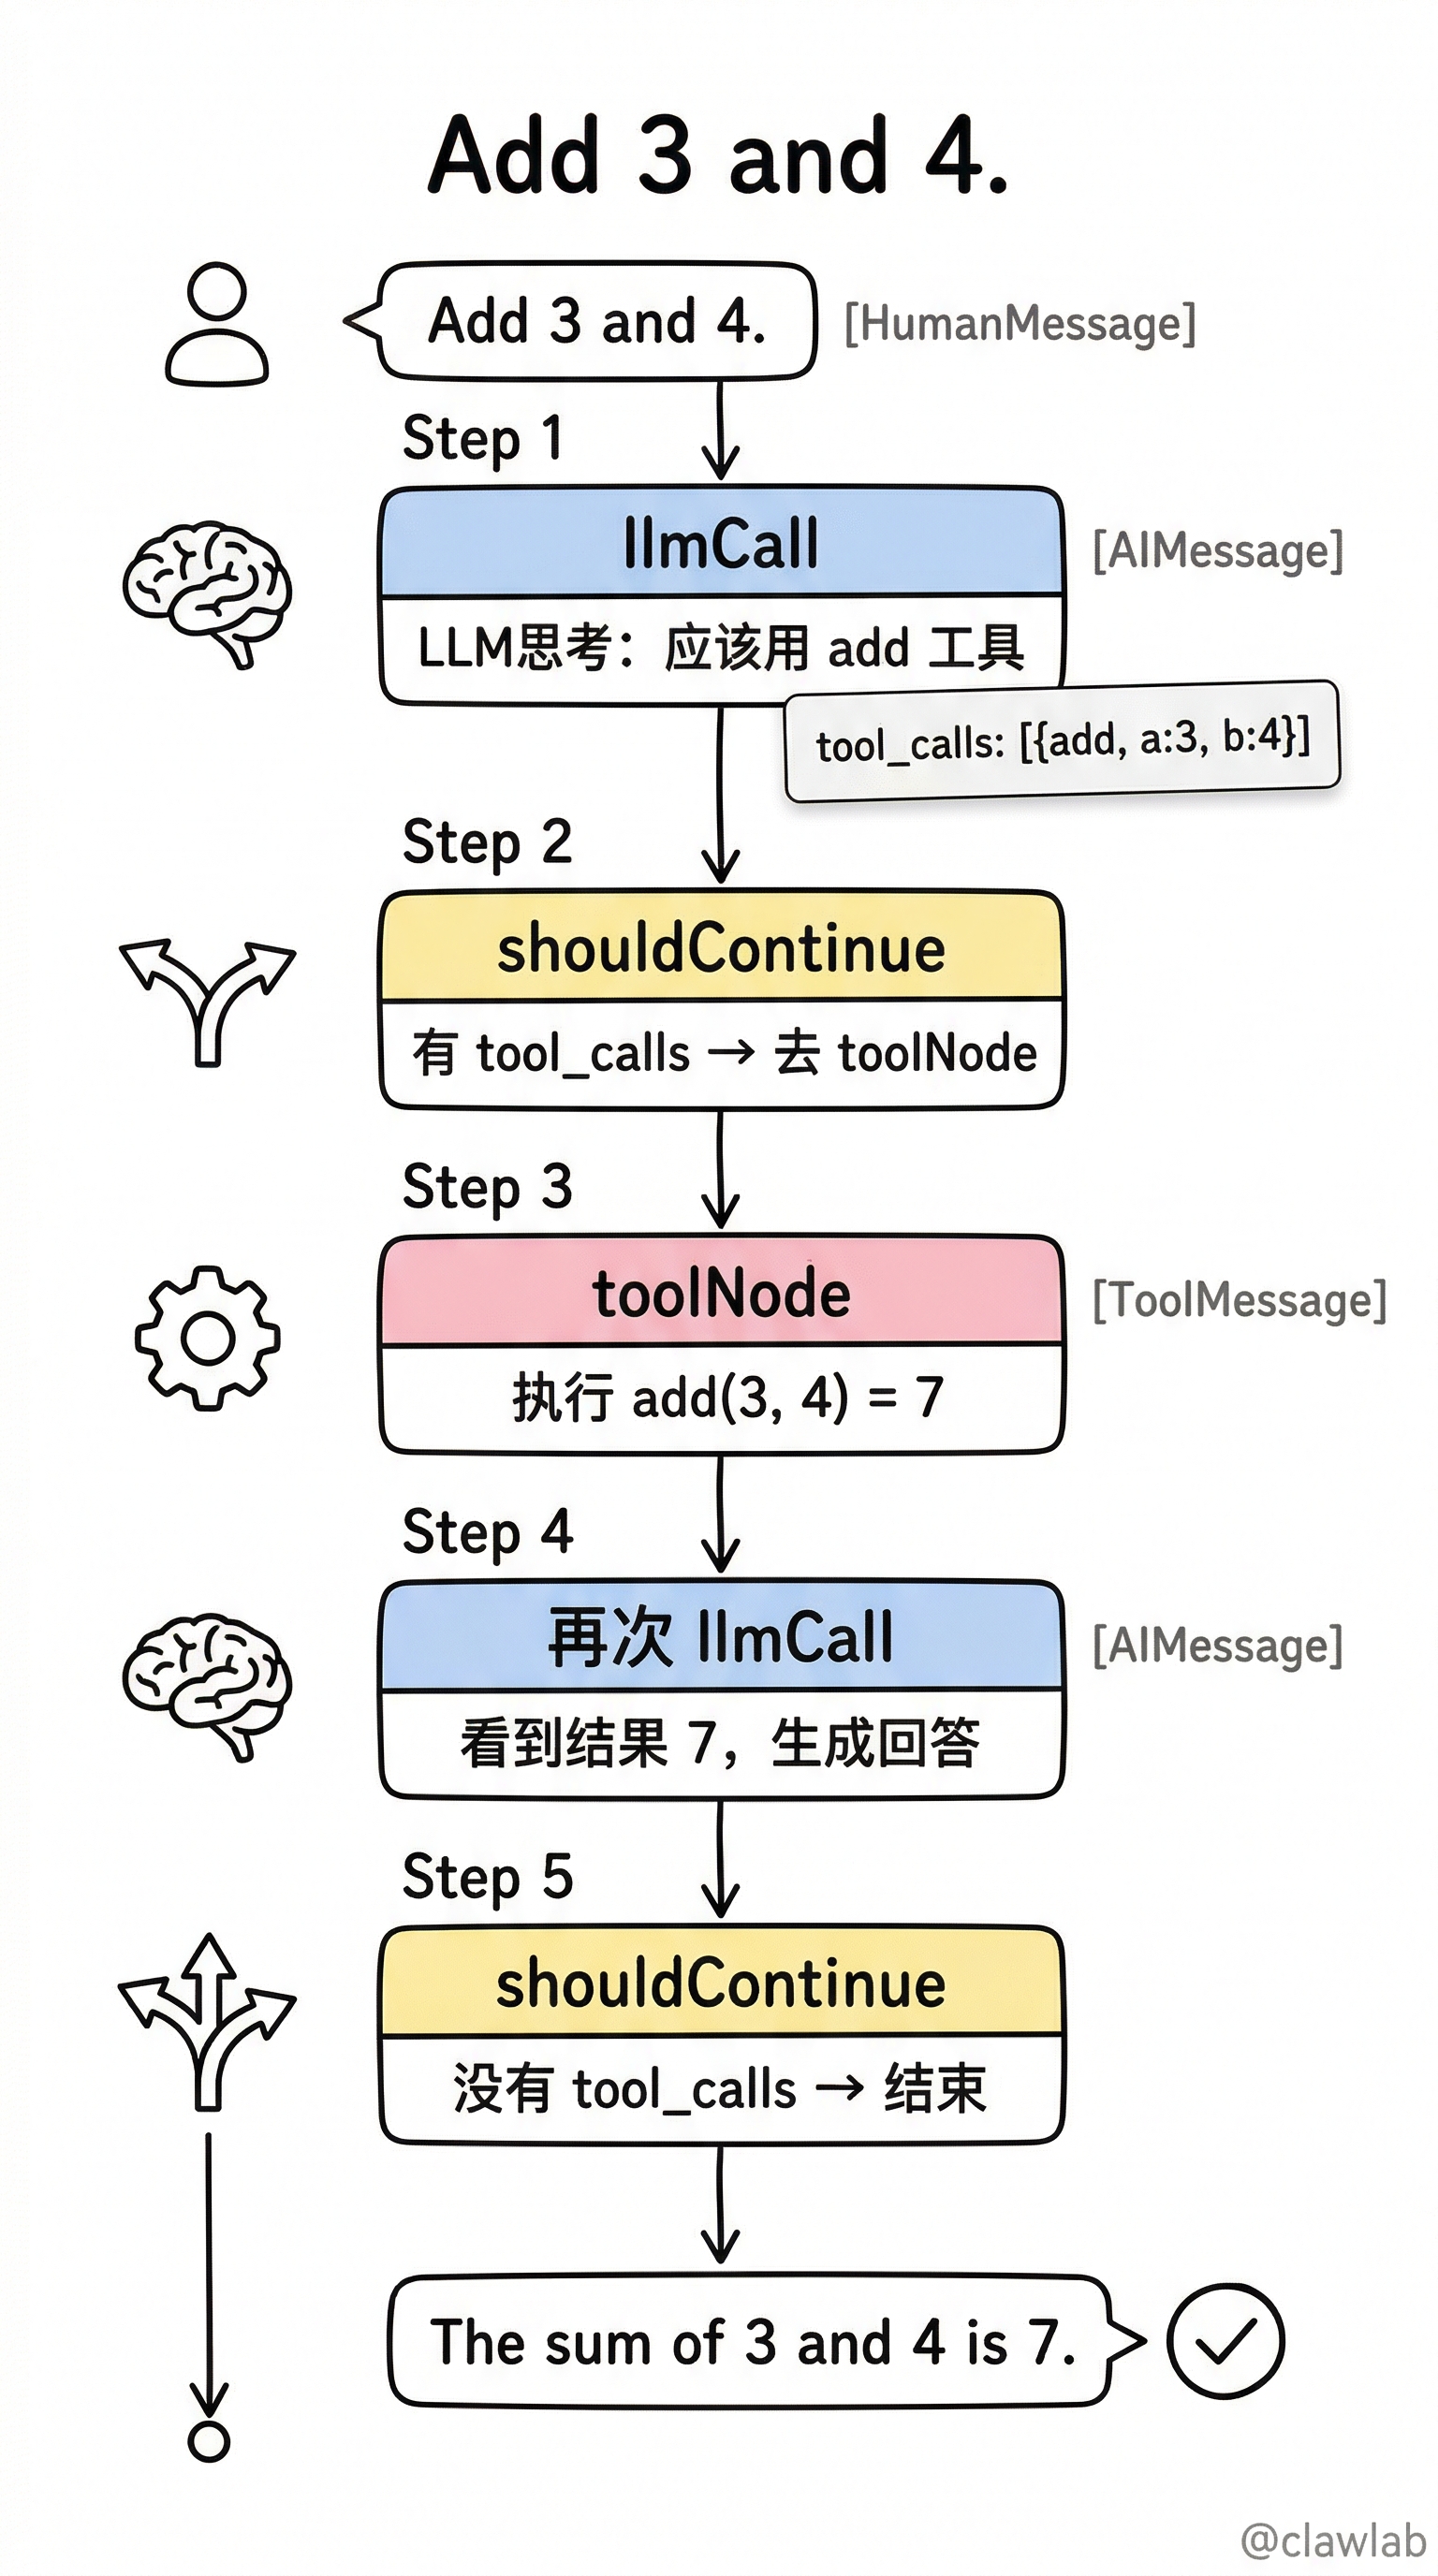
执行流程详解
让我们追踪一下 "Add 3 and 4." 的完整执行过程:
┌─────────────────────────────────────────────────────────────┐
│ 用户输入: "Add 3 and 4."                                    │
└─────────────────────────┬───────────────────────────────────┘
                          │
                          ↓
┌─────────────────────────────────────────────────────────────┐
│ Step 1: llmCall 节点                                        │
│ LLM 思考: "用户想加两个数,我应该用 add 工具"                 │
│ 输出: { tool_calls: [{ name: "add", args: { a: 3, b: 4 }}]} │
└─────────────────────────┬───────────────────────────────────┘
                          │
                          ↓
┌─────────────────────────────────────────────────────────────┐
│ Step 2: shouldContinue 判断                                 │
│ "有 tool_calls!去 toolNode"                                │
└─────────────────────────┬───────────────────────────────────┘
                          │
                          ↓
┌─────────────────────────────────────────────────────────────┐
│ Step 3: toolNode 节点                                       │
│ 执行 add(3, 4) = 7                                         │
│ 输出: ToolMessage { content: "7" }                         │
└─────────────────────────┬───────────────────────────────────┘
                          │
                          ↓
┌─────────────────────────────────────────────────────────────┐
│ Step 4: 再次 llmCall                                        │
│ LLM 看到工具返回结果 7                                       │
│ 思考: "计算完成了,可以回答用户了"                            │
│ 输出: "The sum of 3 and 4 is 7."                           │
└─────────────────────────┬───────────────────────────────────┘
                          │
                          ↓
┌─────────────────────────────────────────────────────────────┐
│ Step 5: shouldContinue 判断                                 │
│ "没有 tool_calls,结束!"                                   │
└─────────────────────────┬───────────────────────────────────┘
                          │
                          ↓
┌─────────────────────────────────────────────────────────────┐
│ 最终输出: "The sum of 3 and 4 is 7."                       │
└─────────────────────────────────────────────────────────────┘
真实场景扩展:电商客服机器人
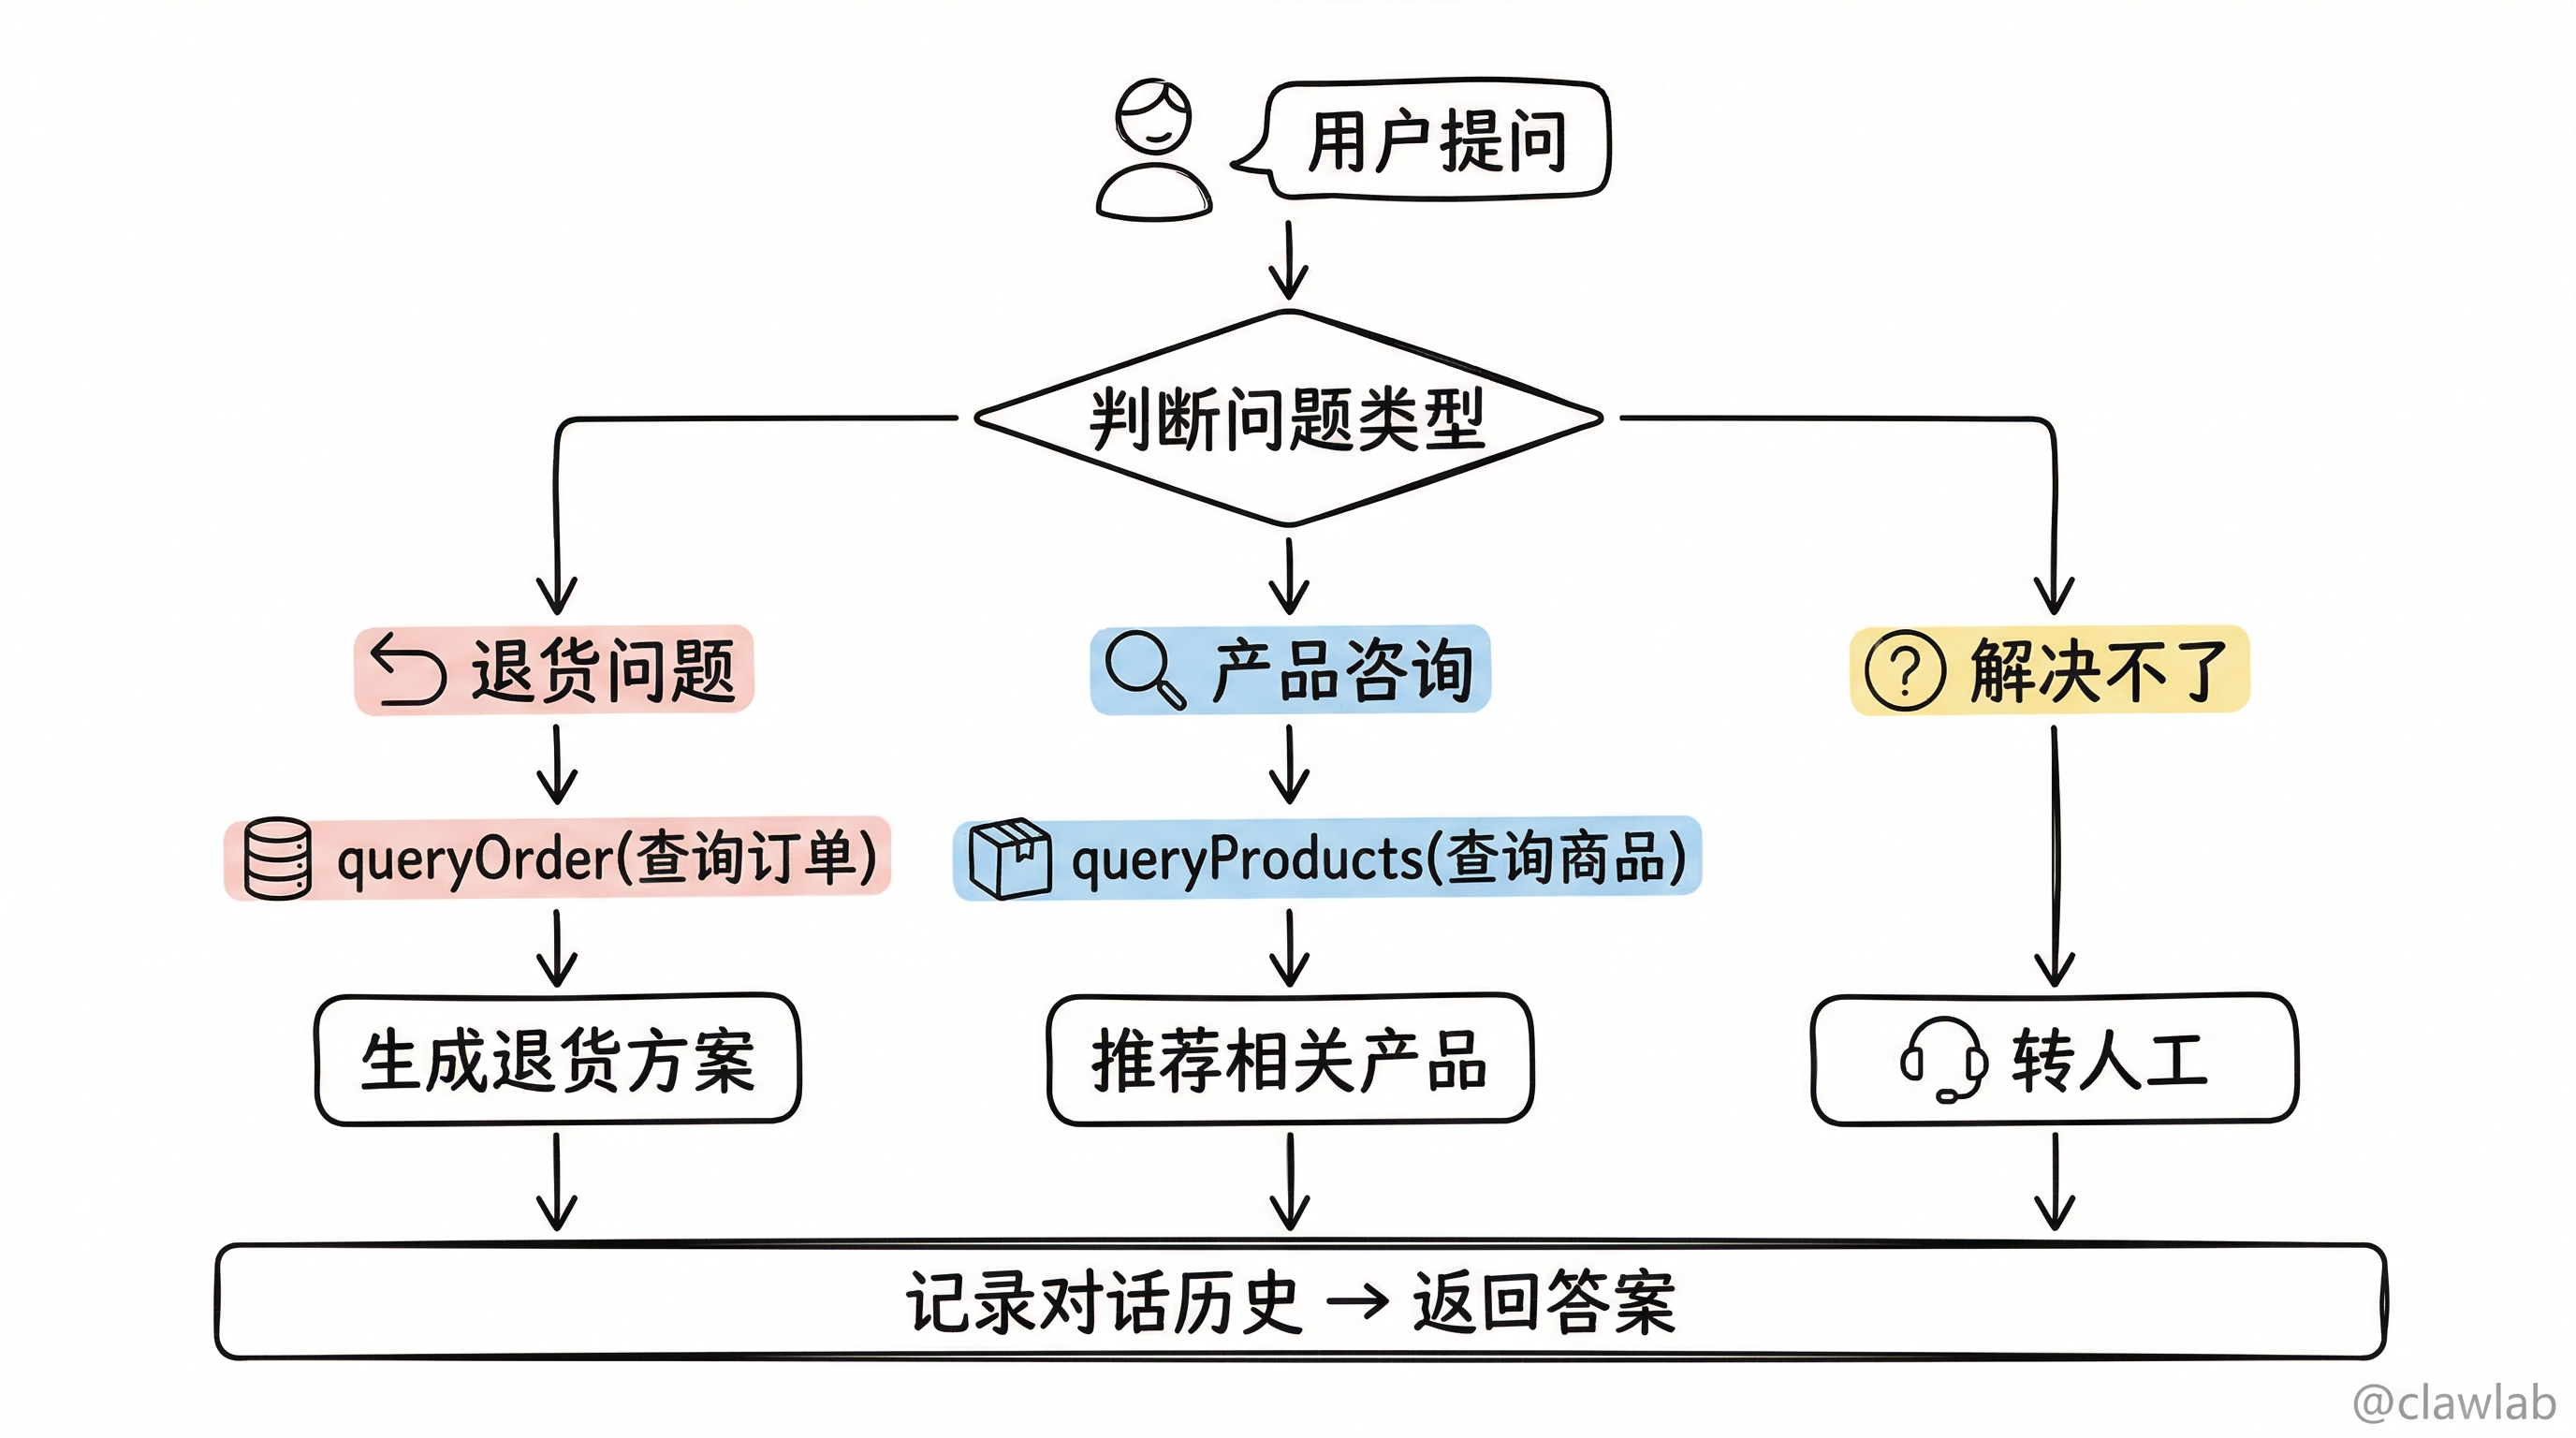
让我们把学到的知识应用到实际场景。假设你要开发一个能处理以下流程的客服 AI:
用户提问 → 判断问题类型 →
  - 如果是退货问题 → 查询订单系统 → 生成退货方案
  - 如果是产品咨询 → 查询商品库 → 推荐相关产品
  - 如果解决不了 → 转人工
→ 记录对话历史 → 返回答案
定义业务工具
typescript
const queryOrder = tool(async ({ orderId }) => {
  // 模拟查询数据库
  return { totalPrice: 100, productPrice: 85, status: "delivered" };
}, {
  name: "queryOrder",
  description: "Query order details by order ID",
  schema: z.object({
    orderId: z.string().describe("The order ID to query"),
  }),
});

const queryProducts = tool(async ({ keyword }) => {
  // 模拟查询商品
  return [
    { name: "Product A", price: 99 },
    { name: "Product B", price: 149 },
  ];
}, {
  name: "queryProducts",
  description: "Search products by keyword",
  schema: z.object({
    keyword: z.string().describe("Search keyword"),
  }),
});
这样,Agent 就能根据用户问题自动选择合适的工具来处理!
核心要点回顾
- 两种 API 风格:Graph API(画流程图)vs Functional API(写函数循环)
- 核心组件:State(状态)、Node(节点)、Edge(边)、Tool(工具)
- Agent 循环:LLM 思考 → 要用工具?→ 执行工具 → 继续思考 → 直到完成
- 工具定义三要素:
name(名称)、description(描述)、schema(参数) - 选择建议:复杂流程用 Graph API,简单流程用 Functional API
下一步学习
恭喜你构建了第一个 LangGraph Agent!接下来:
- 🖥️ 04-本地服务运行:把 Agent 变成可调用的 API 服务
- 🧠 05-LangGraph 思维模式:学习构建 Agent 的 5 步方法论
下一步行动建议
- 跑通示例:把本文的代码复制下来跑一遍
- 加点难度:试试让 AI 算
(3 + 4) * 5,看它能不能正确地先加后乘 - 换个工具:把计算器换成调用 API 查天气,感受工具的灵活性
- 用 LangSmith:可视化你的 Agent 执行流程
📅 更新时间:2026-02-22